Cluster
The Cluster page displays a comprehensive list of clusters associated with the respective tenant. It provides detailed insights into each cluster, including their status and YCU consumption.
Users can access Clusters by selecting the ‘Clusters’ option in the Yeedu navigation panel.
Yeedu enables users to both create and manage clusters.
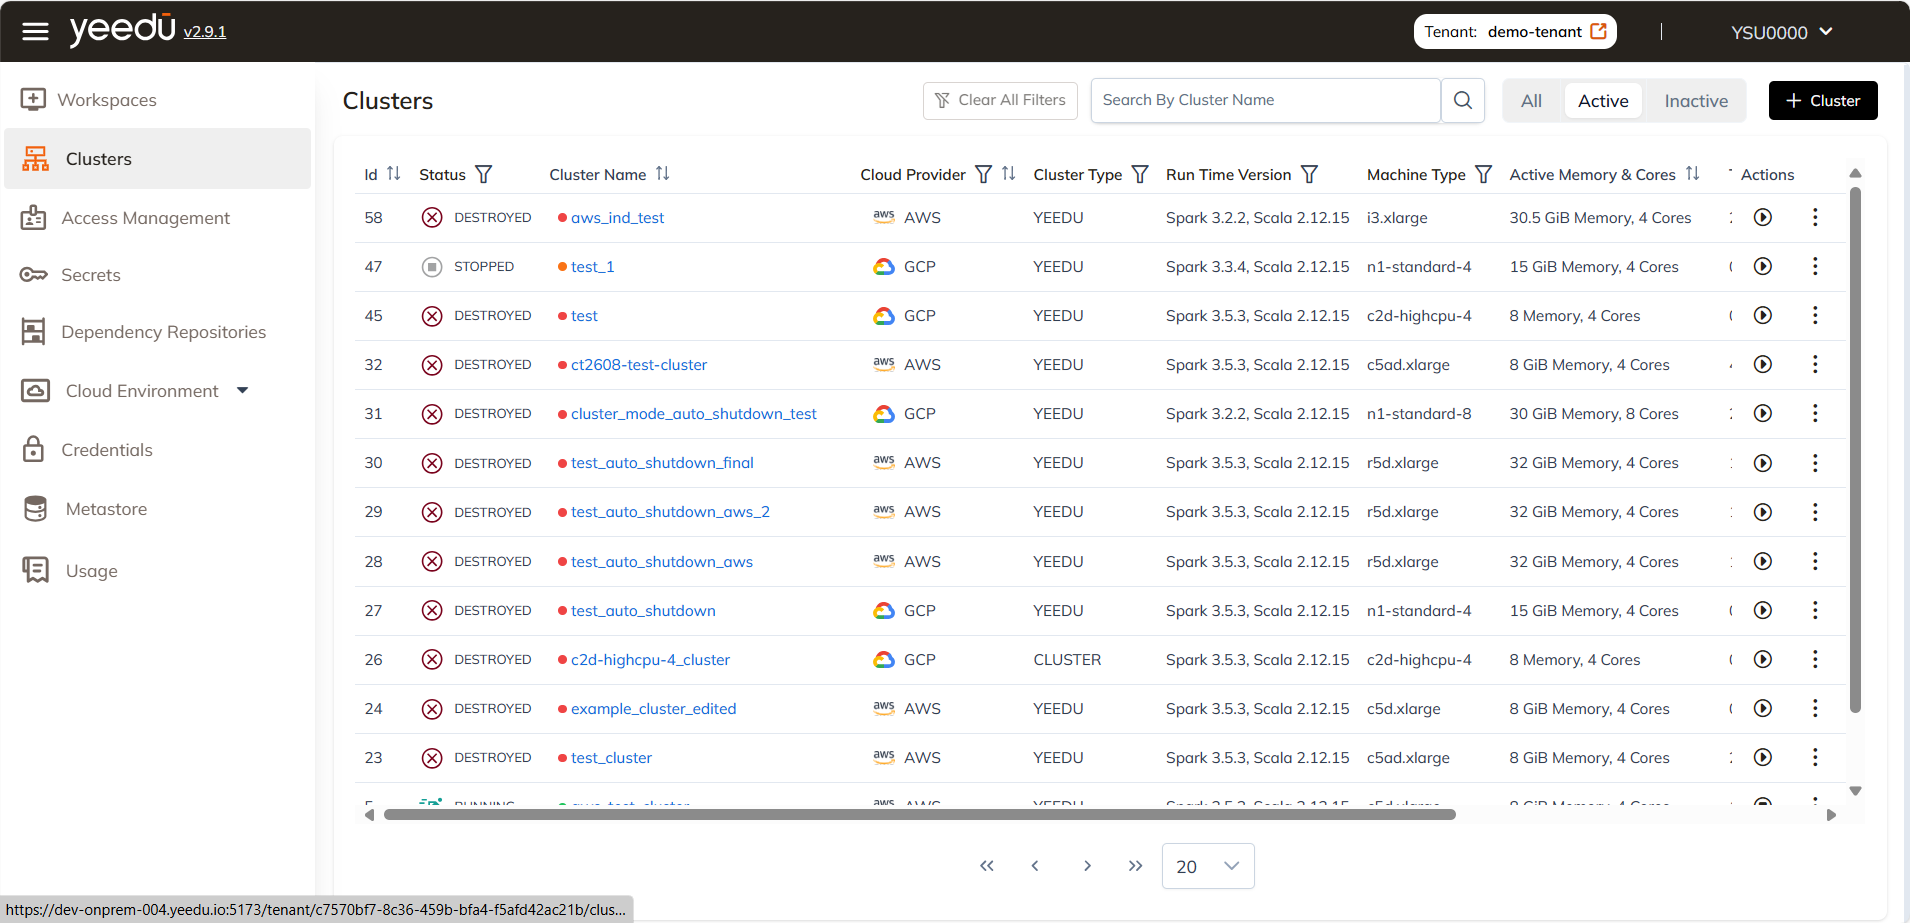
The clusters landing page displays the following information:
- ID: Unique identifier associated with the clusters.
- Status: Current status of the clusters.
- Cluster Name: Name of the cluster.
- Cloud Provider: Cloud provider for which the cluster is created.
- Cluster Type: Type of cluster, which can be Yeedu, Standalone, or Cluster.
- Runtime Version: Spark and Scala runtime version for the cluster.
- Active Memory and Cores: Memory and cores allocated for the cluster.
- Total YCU: YCU (Yeedu Compute Unit), used to calculate total compute cost in Yeedu.
- Created By: Username of the user who created the cluster.
- Modified By: Username of the user who last modified the cluster.
- Action Tab: Provides options for the user to stop the running cluster and destroy the cluster.
Manage
Create Cluster
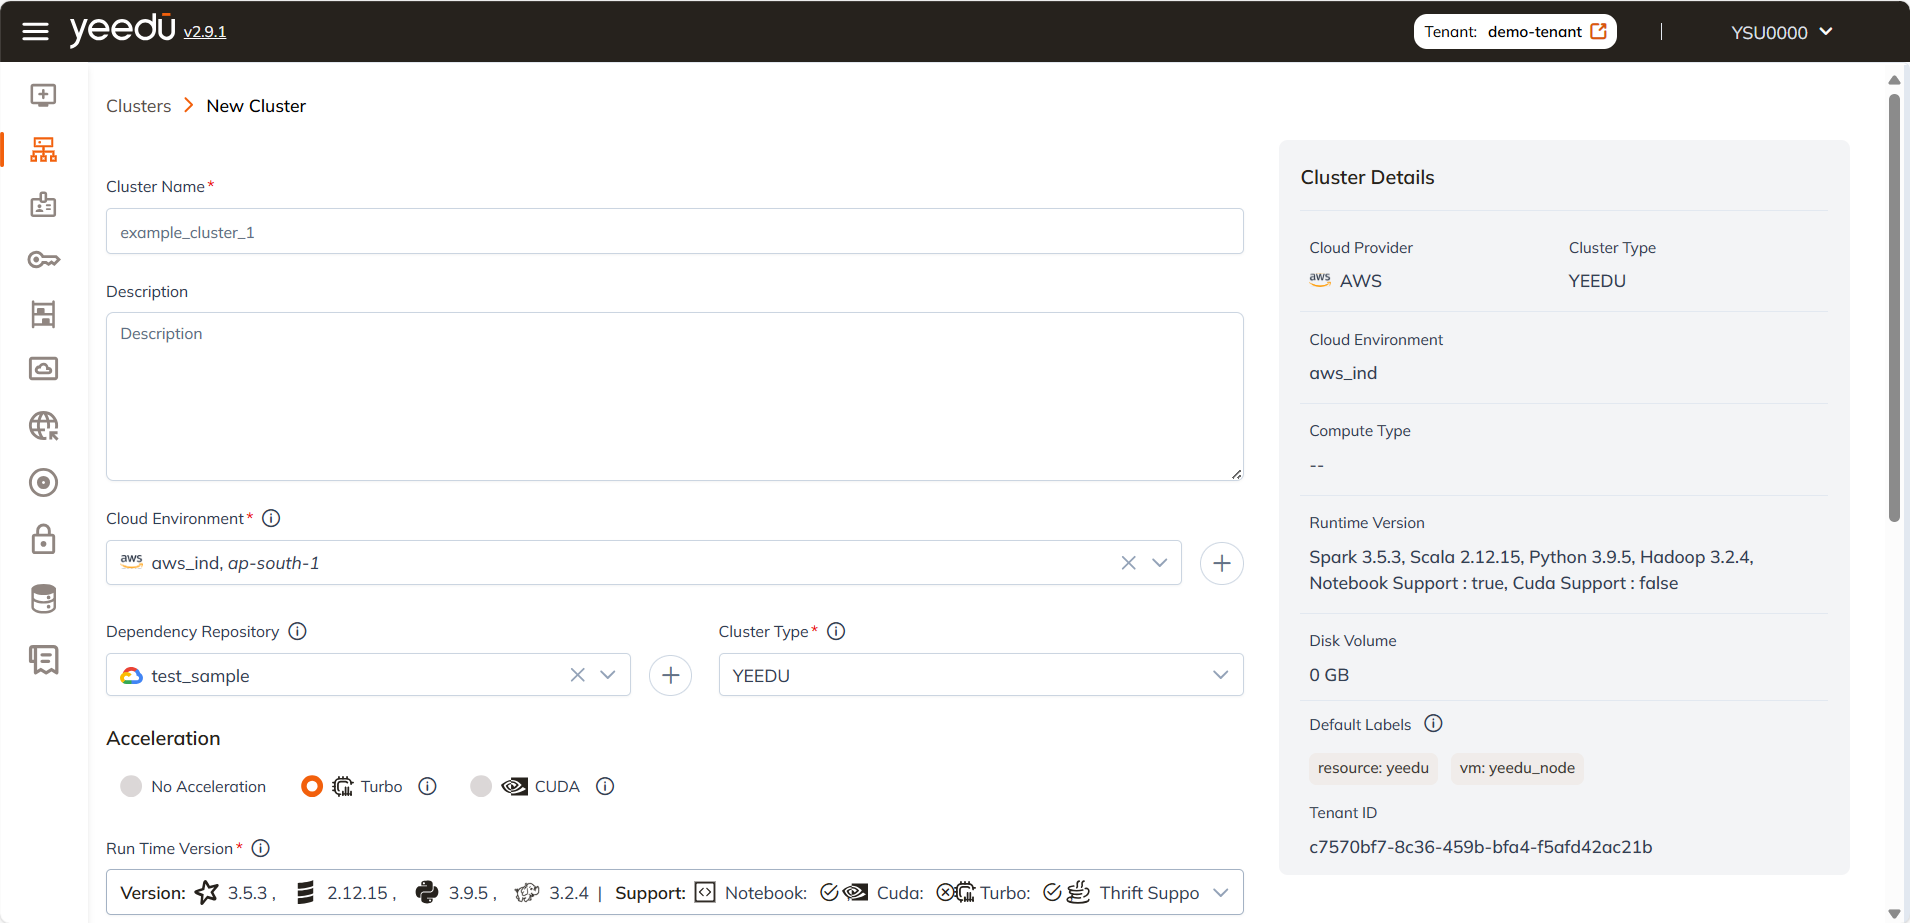
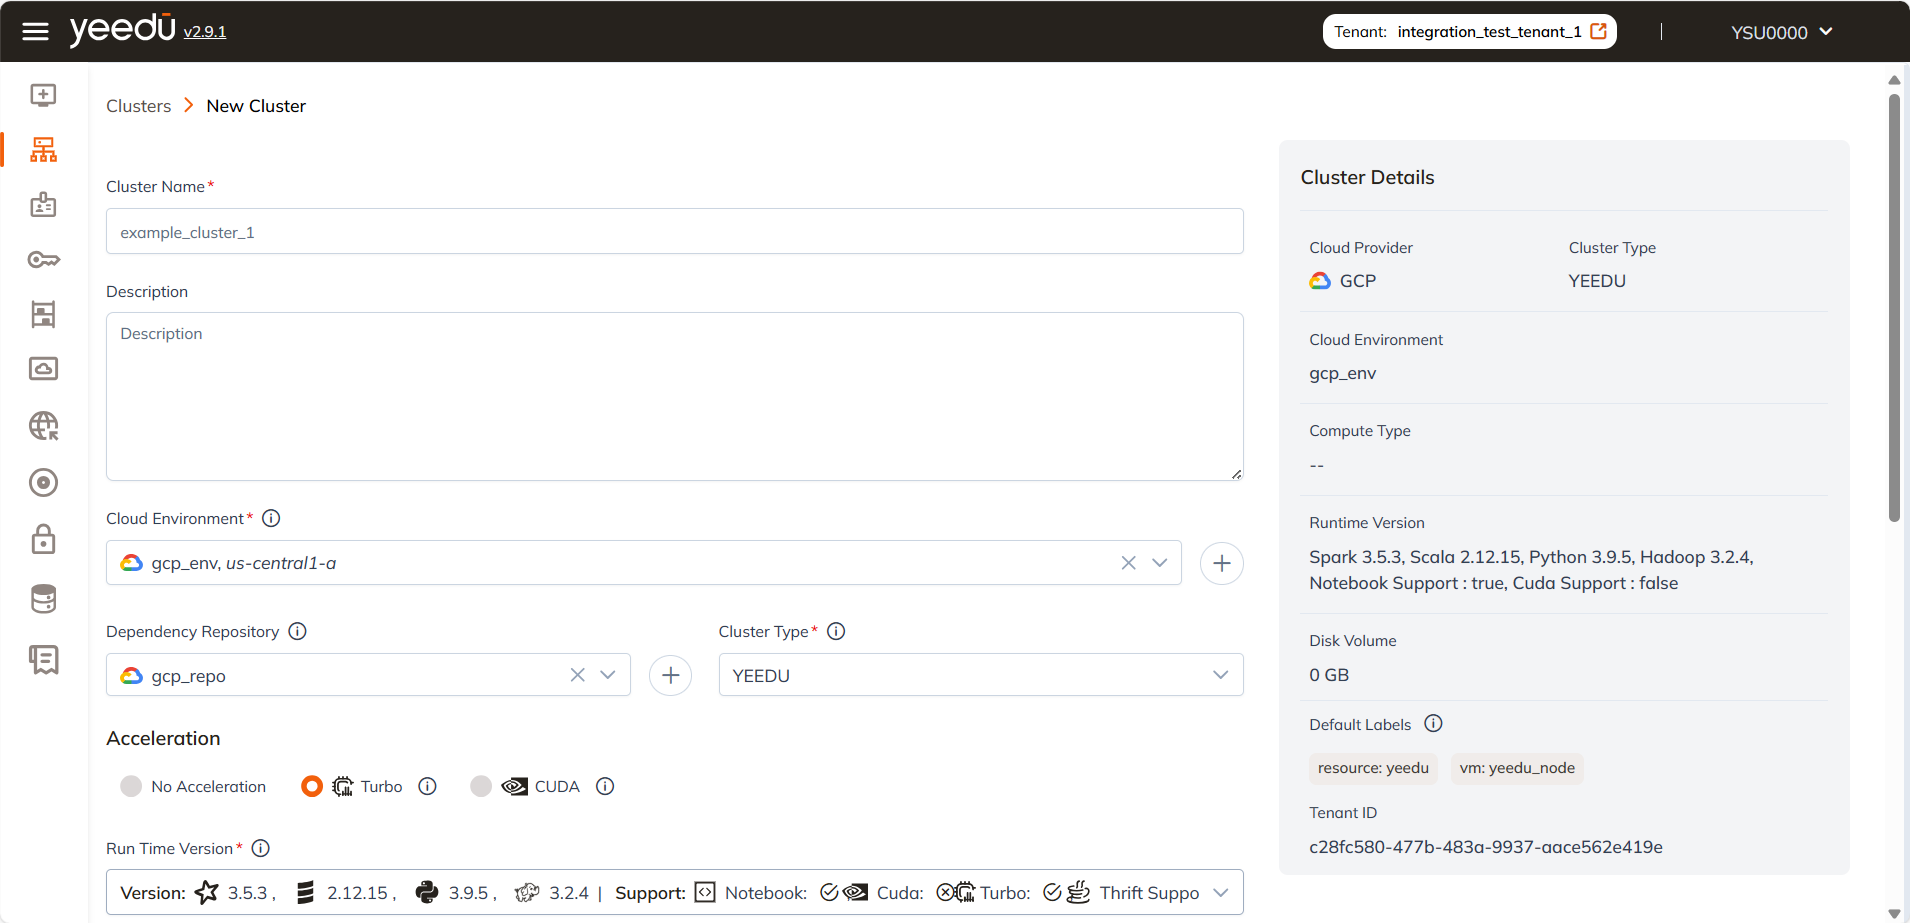
On the right side of the Cluster dashboard, users can find the '+ Cluster' button located above the Action tab. This button is utilized for creating a new Cluster. Clicking on the '+ Cluster' button will prompt a pop-up window to create a new Cluster.
-
Cluster Name: Input the name of the cluster, following these prerequisites:
- Maximum length: 64 characters
- Lowercase letters
- Permitted symbols: '-', '_', '@', and '.'
-
Description: Describe the cluster in this field.
-
Cloud Environment: Select the cloud environment for deploying the cluster. Yeedu supports Azure, AWS, and GCP cloud platforms.
-
Runtime Version: Choose the Spark infrastructure version based on requirements.
-
Cluster Type: Select from three types: Yeedu, Standalone, and Cluster. Once selected, the cluster type cannot be modified later.
- Yeedu Mode
- Cluster Mode
- Standalone Mode
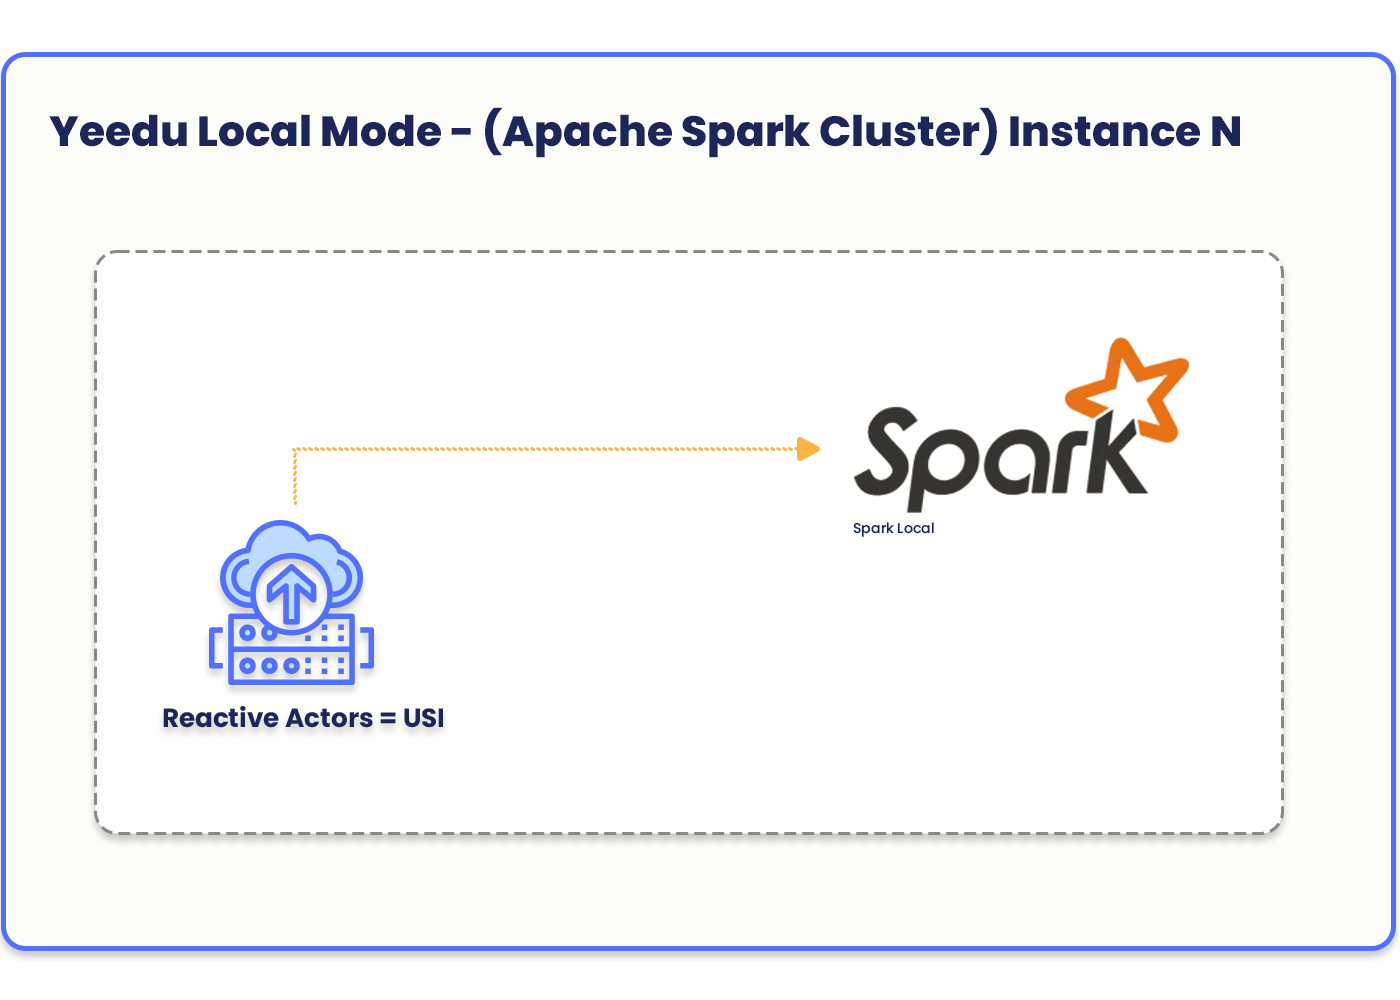
In Yeedu Mode, a fully managed and optimized Spark infrastructure is provided, leveraging cost-optimized resources to deliver optimal performance and scalability for Spark workloads. This mode runs Spark in local mode, ensuring a seamless and hassle-free experience in managing and executing Spark jobs.
- Min Instances: The minimum number of instances required when creating the cluster. The default minimum is 1.
- Max Instances: The maximum number of instances the cluster can scale up to, with a limit of 30 instances.
- No. of Worker per Node: The number of Spark worker nodes to be deployed within the same instance.
- No. of Parallel Execution: The maximum number of parallel jobs that can be executed on a specific instance.
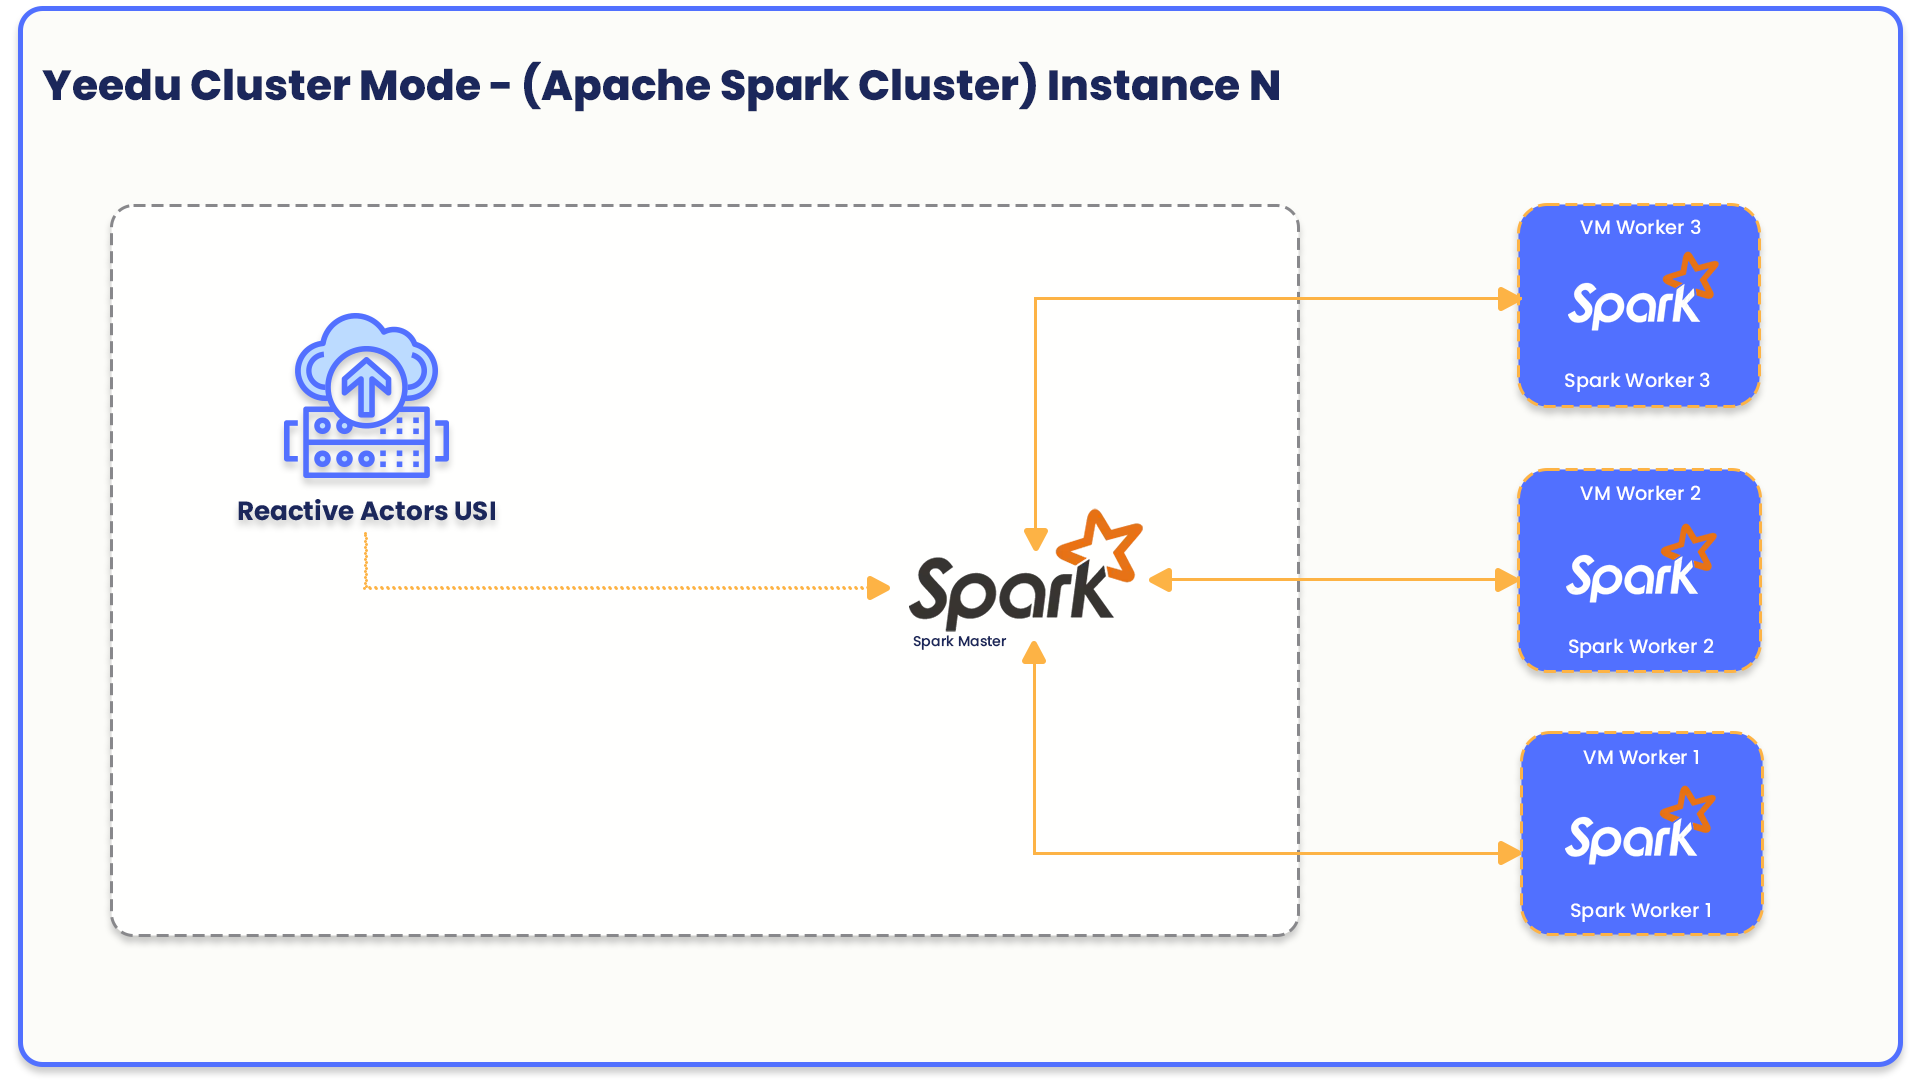
In Cluster mode, Yeedu utilizes a dedicated virtual machine architecture to deploy Spark master and worker nodes on separate virtual machines. This approach enables a more scalable and robust deployment, allowing for horizontal scaling of worker nodes based on workload demands.
- No. of Worker per Node: The number of worker instances to be created for the Spark cluster.
- No. of Parallel Execution: The maximum number of parallel jobs that can be executed on a specific instance.
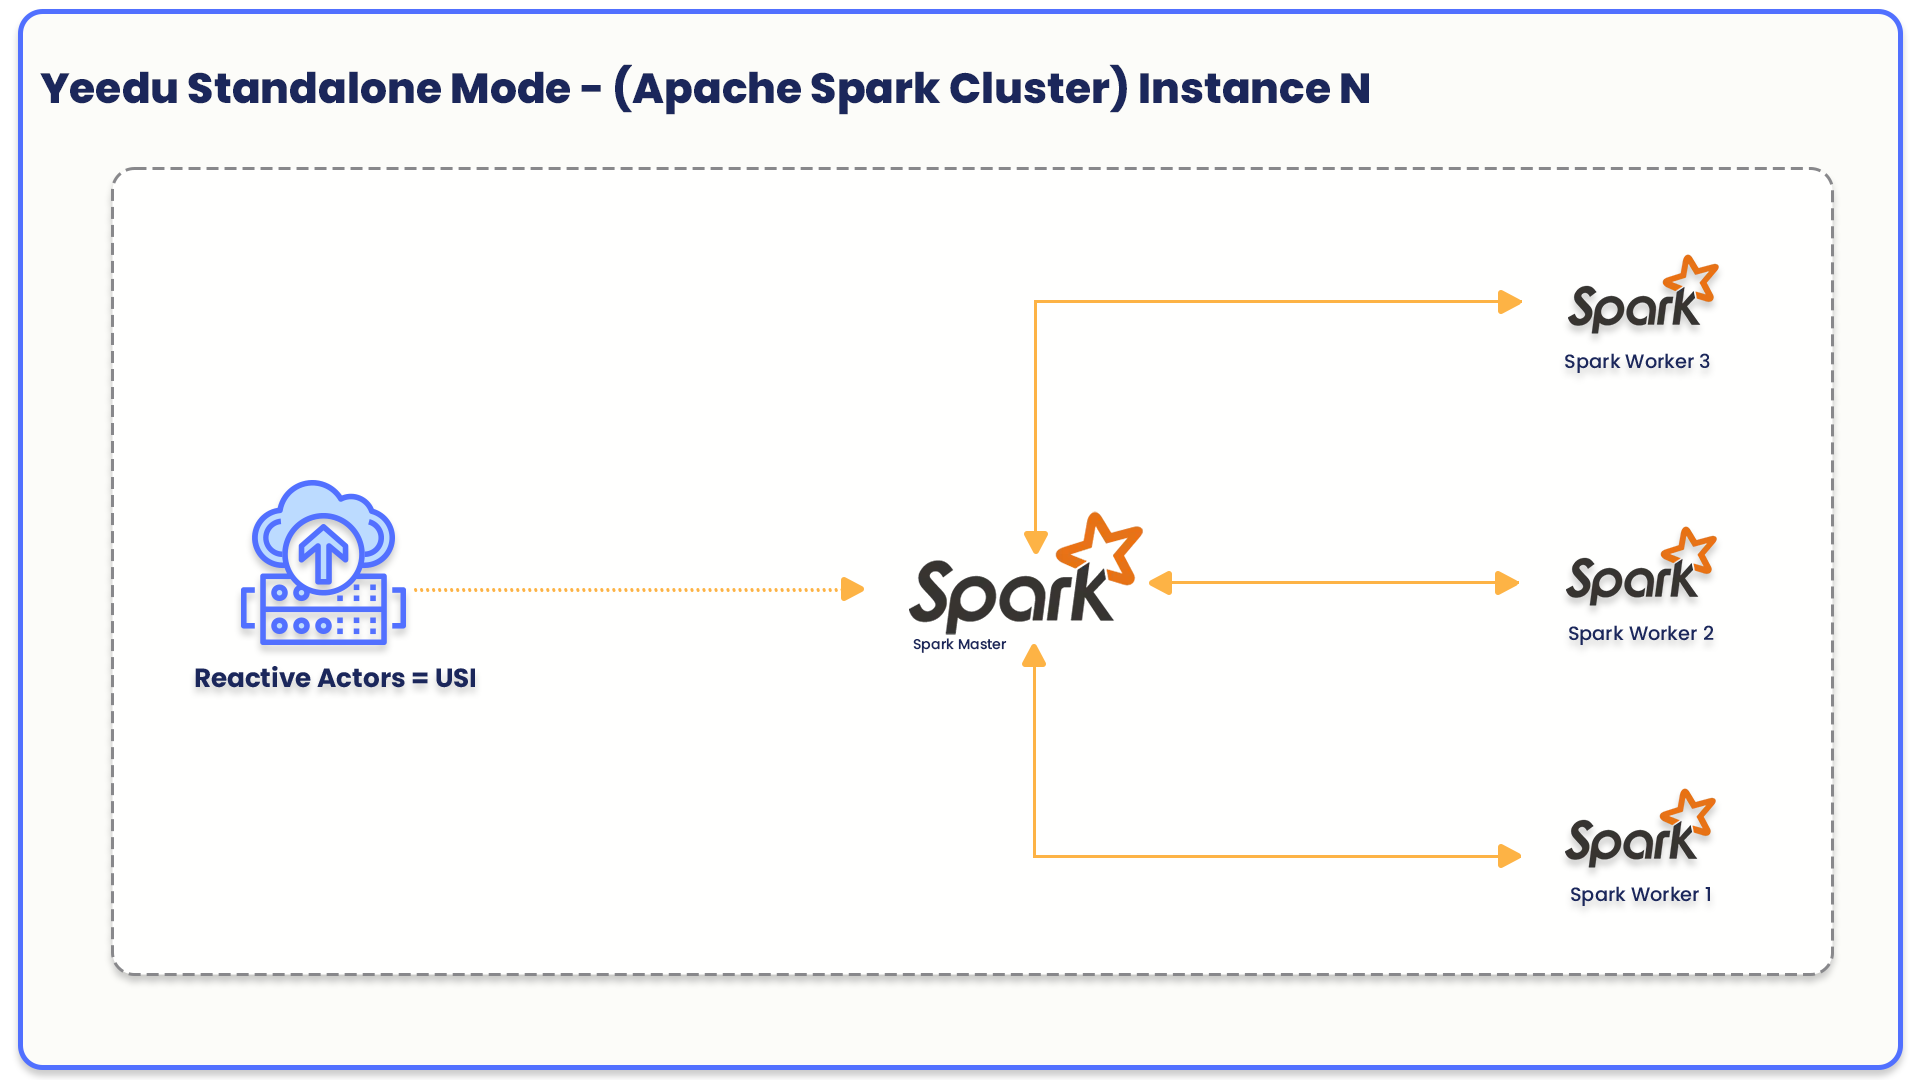
In Standalone Cluster mode, Yeedu leverages the flexibility and portability of Docker containers to deploy Spark master and worker nodes within a single virtual machine. This approach streamlines and simplifies the deployment process, with all components residing within a single environment.
- Min Instances: The minimum number of instances required when creating the cluster. The default minimum is 1.
- Max Instances: The maximum number of instances the cluster can scale up to, with a limit of 30 instances.
- No. of Worker per Node: The number of Spark worker nodes to be deployed within the same instance.
- No. of Parallel Execution: The maximum number of parallel jobs that can be executed on a specific instance.
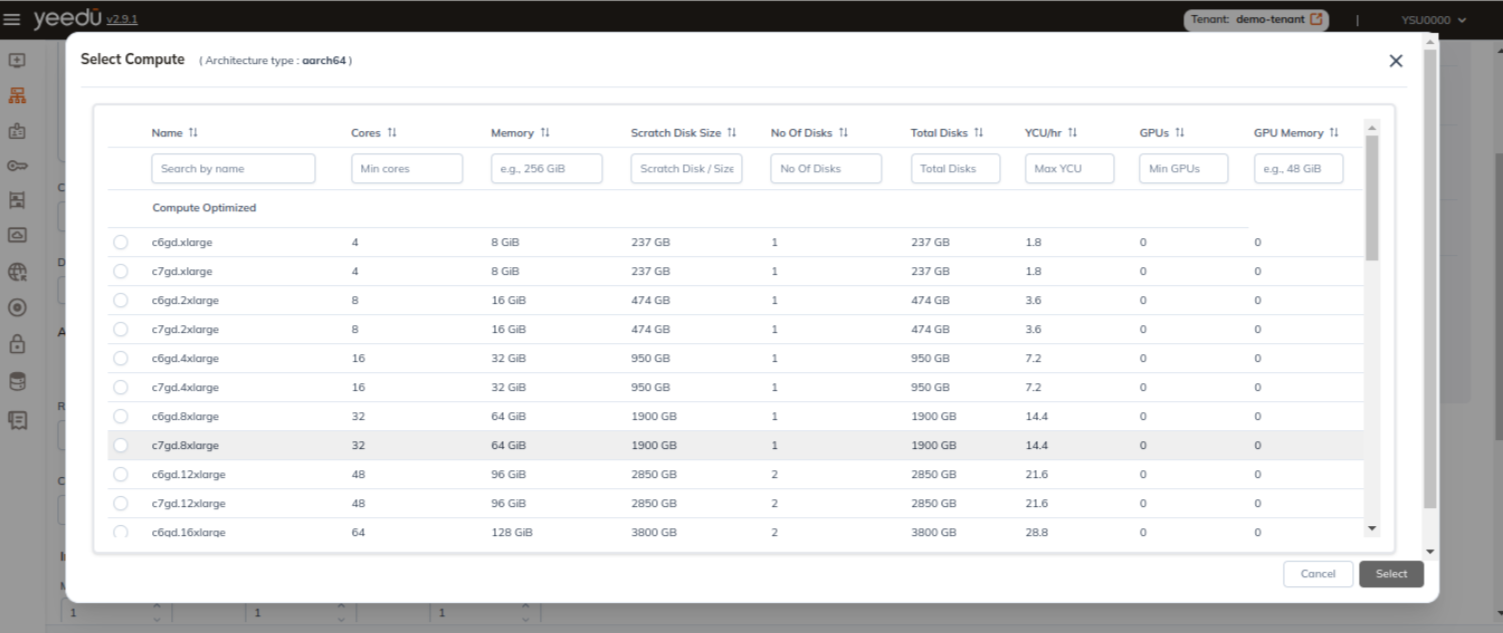
- Compute: Recommended machine types to create virtual machine.
- Instances: Configure details such as minimum instances, maximum instances, number of parallel executions, and number of workers.
- Spot Instances in Yeedu
Status: Experimental
What Are Spot Instances?
Spot Instances allow Yeedu users to leverage significantly discounted cloud virtual machines (VMs) — typically 70–90% cheaper than standard on-demand pricing — from providers such as AWS, Azure, and Google Cloud Platform (GCP). These cost savings make Spot Instances ideal for:
- Stateless, retryable, or fault-tolerant workloads
- Batch processing
- CI/CD jobs
- Data preprocessing or transformation pipelines
Spot Instances can be interrupted at any time by the cloud provider with little to no warning. This makes them unsuitable for workloads that require guaranteed availability or long uninterrupted run times.
- Auto Shutdown: Enable auto shutdown of the cluster and instances after a specified number of minutes of inactivity.
- Labels: Add labels to the cluster for organizational purposes.
- Dependencies: Select any required dependency repositories for the cluster.

- Spark Config: In the Spark Config section, users can add additional configurations such as packages, JARs, archives, repositories, Py-files, environment variables, and default configurations.
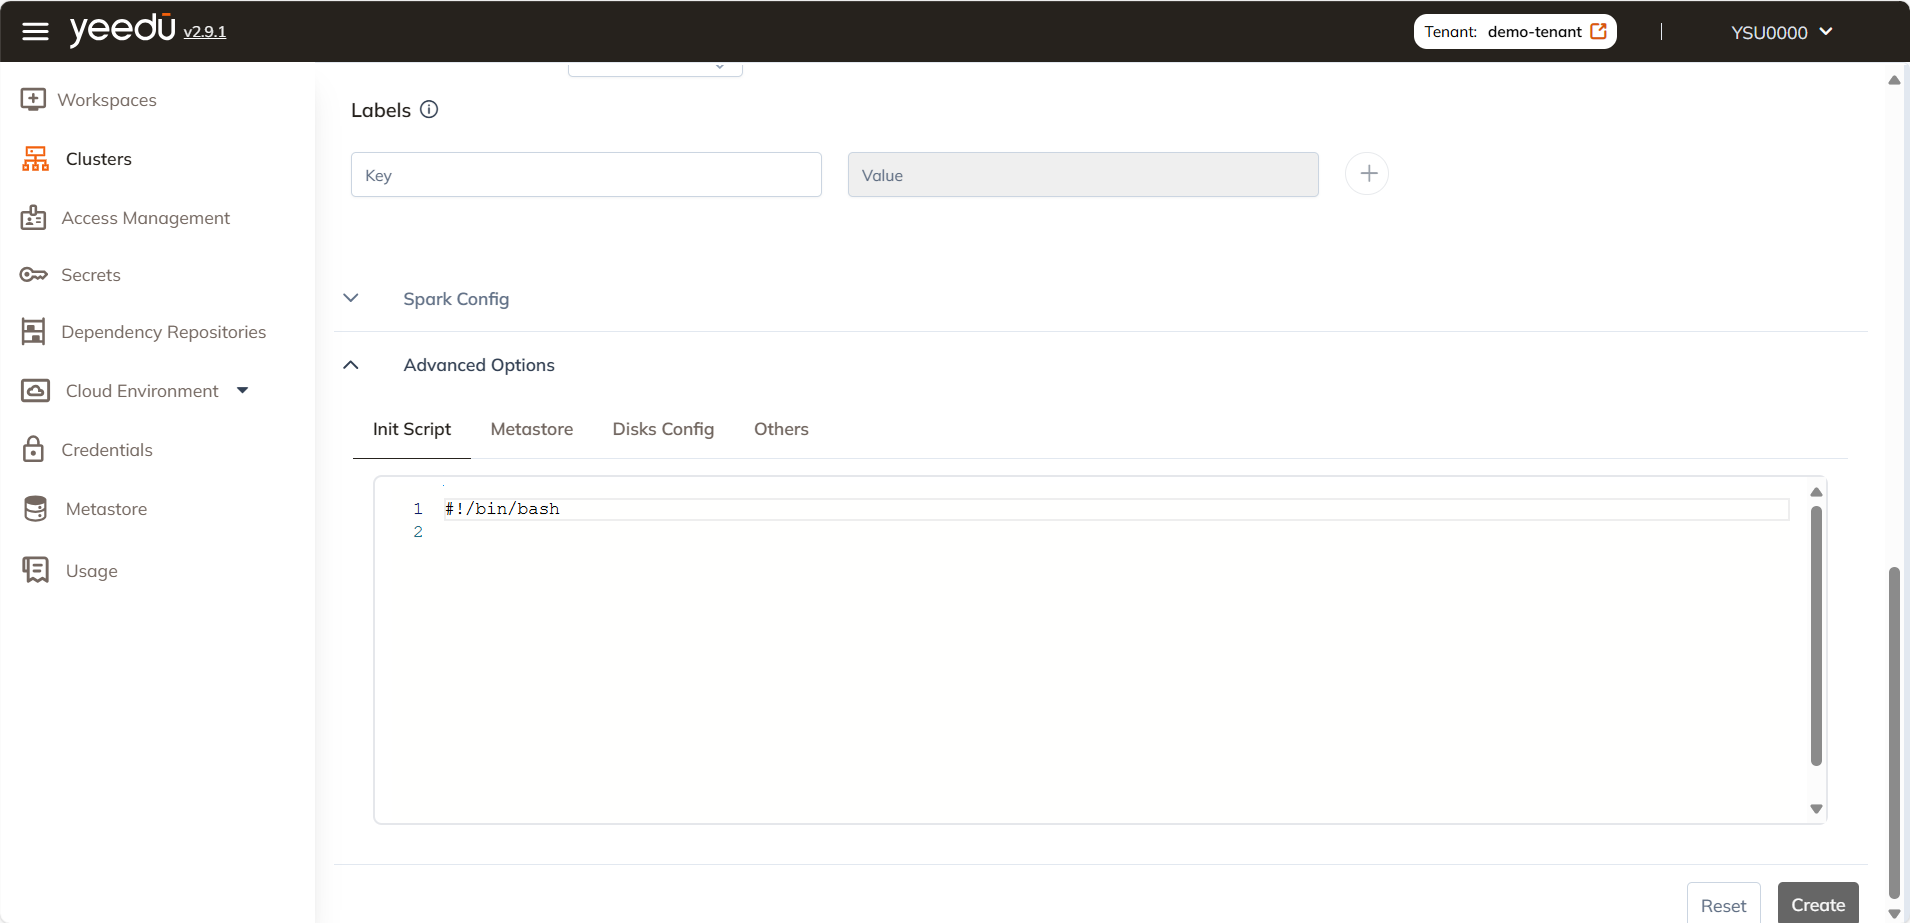
- Advanced Options: Here, users can provide additional details like init scripts, Hive Metastore settings, and others.
On the right side of the page, there is a section for cluster details where users can view the cluster's configuration while they are creating the cluster.
At the bottom of the page, users have two buttons:
- Reset: Reset all configurations selected for the cluster and clear all fields.
- Create: Submits the details to create a new cloud environment; ensure all required fields (*) are filled before clicking.
Yeedu – Disk Configuration (Advanced Options)
Disk Config defines cluster storage settings (capacity, IOPS, throughput), adapting to the cloud provider to balance cost, performance, and scalability.
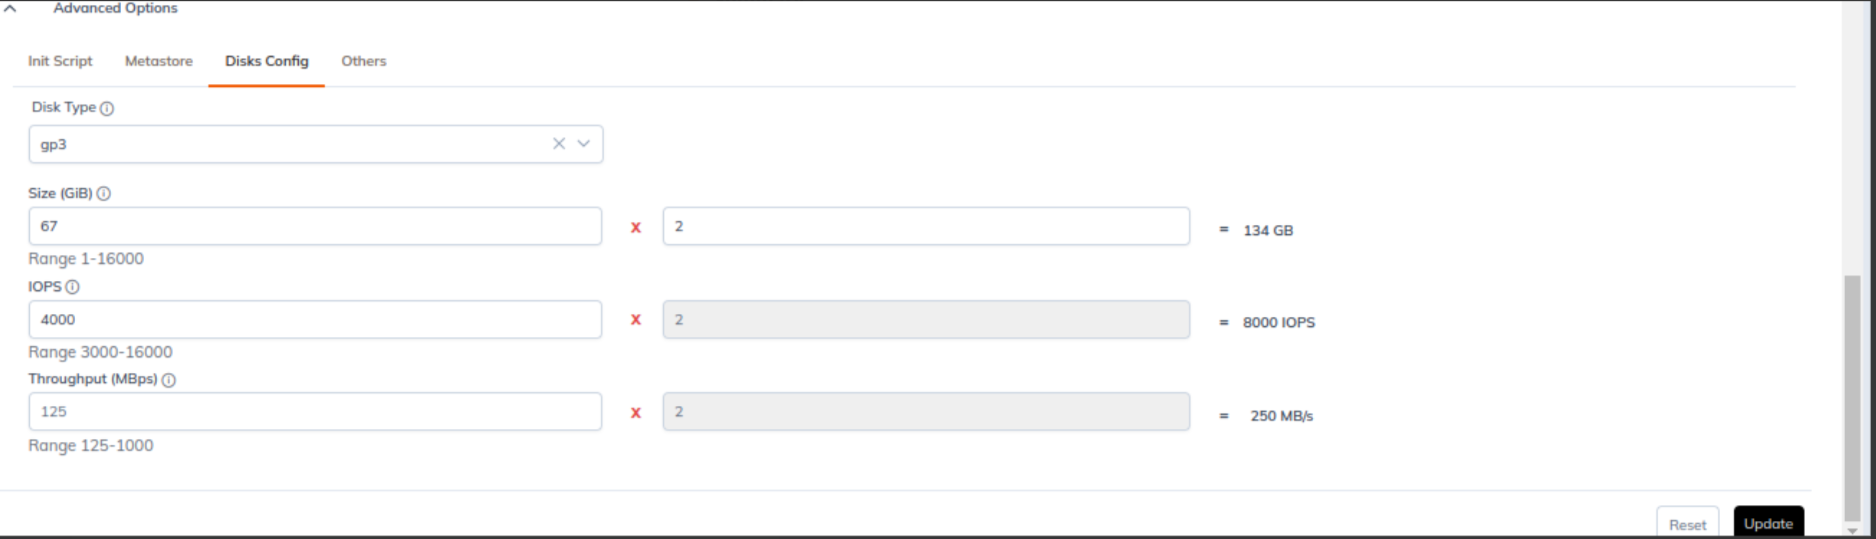
- Disk Type: Selects volume type (cloud-aware, e.g., gp3, pd-ssd, Premium_LRS).
- Size (GiB): Sets disk capacity; larger sizes may unlock higher performance.
- IOPS: Defines read/write operations per second; varies by disk type and provider.
- Throughput (MBps): Controls max data transfer rate per disk; provider-dependent.
- Multiplier (×N Disks): Number of disks provisioned; scales size, IOPS, and throughput linearly.
View / Modify Cluster
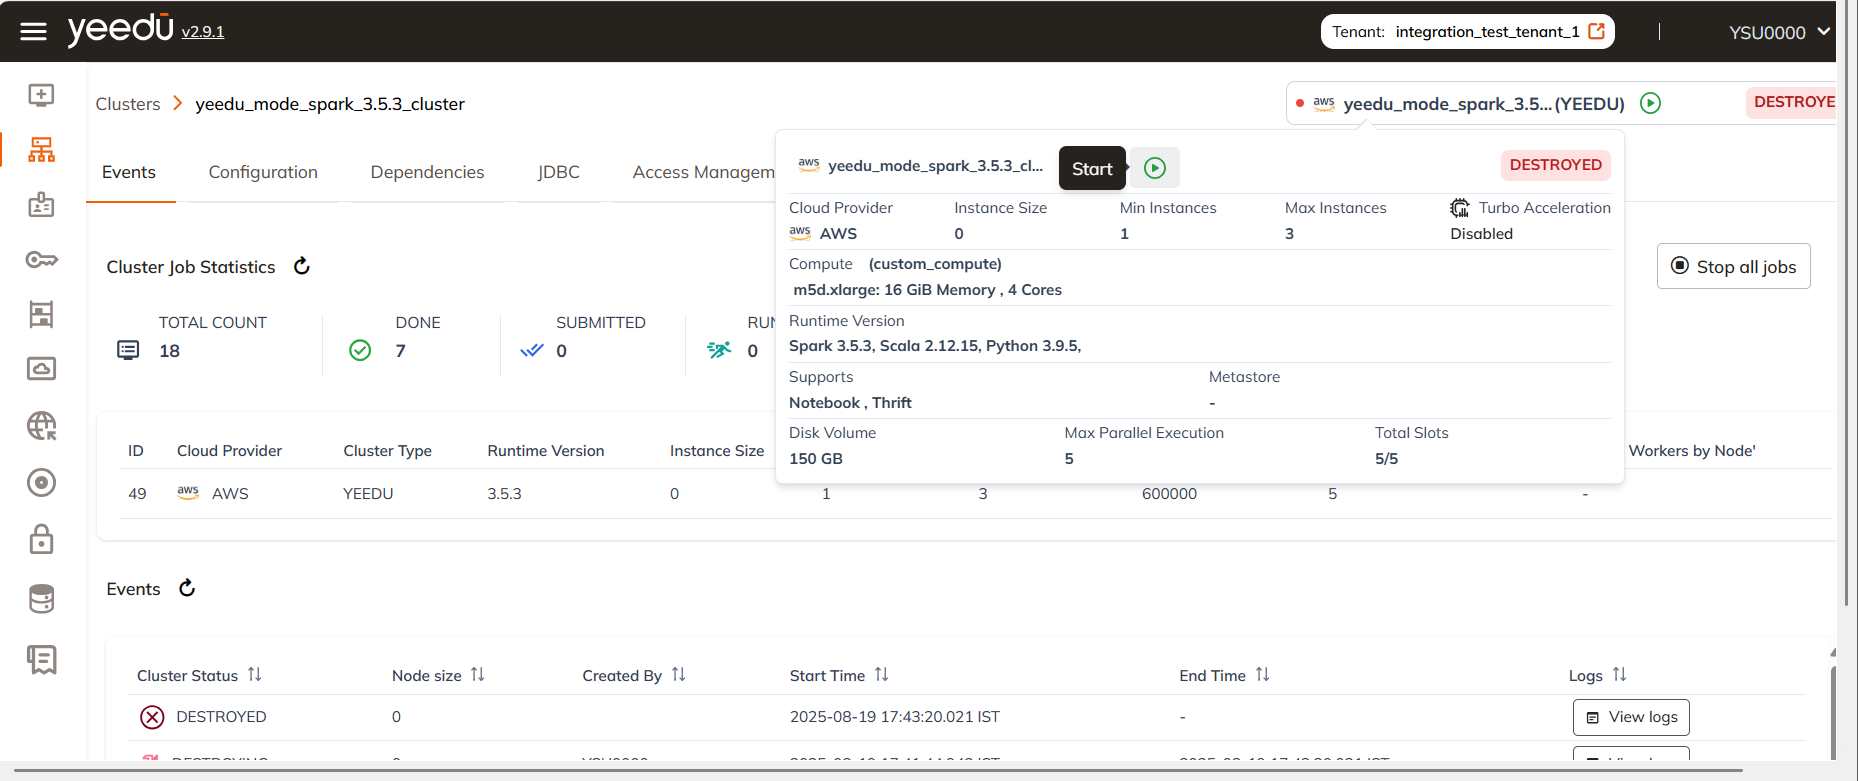
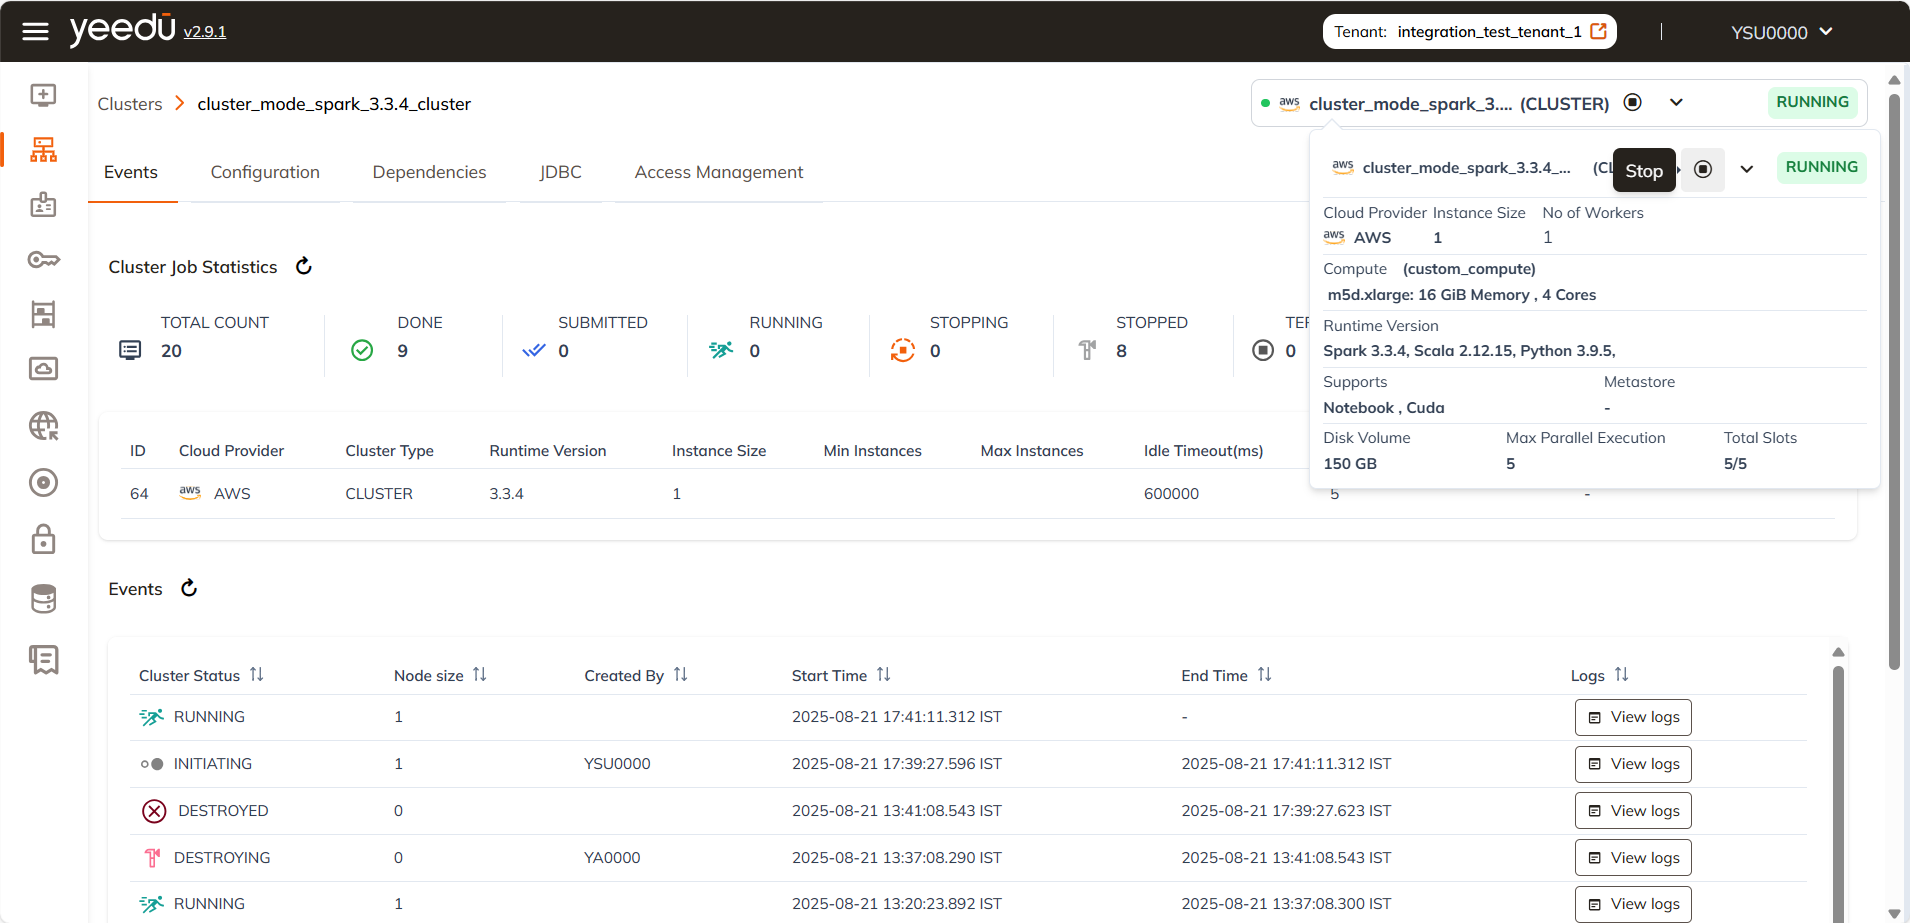
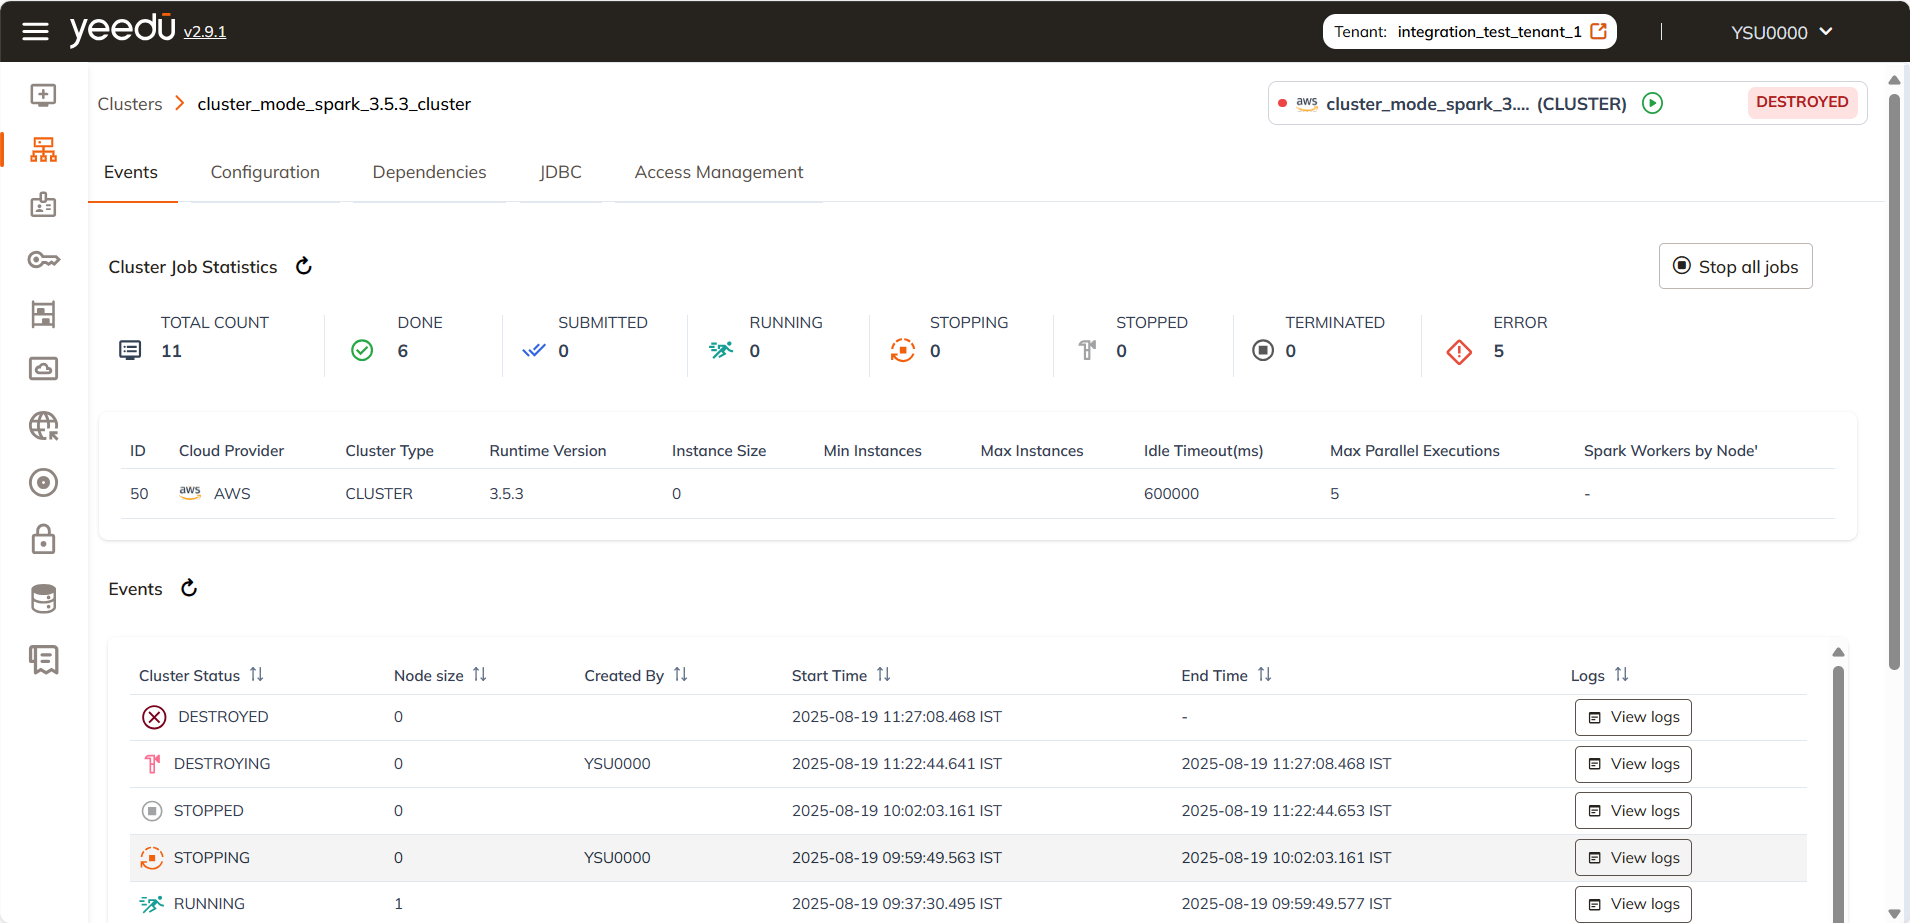
The cluster dashboard comprises of 5 windows: Events, Configuration, Dependencies, JDBC, Access Management
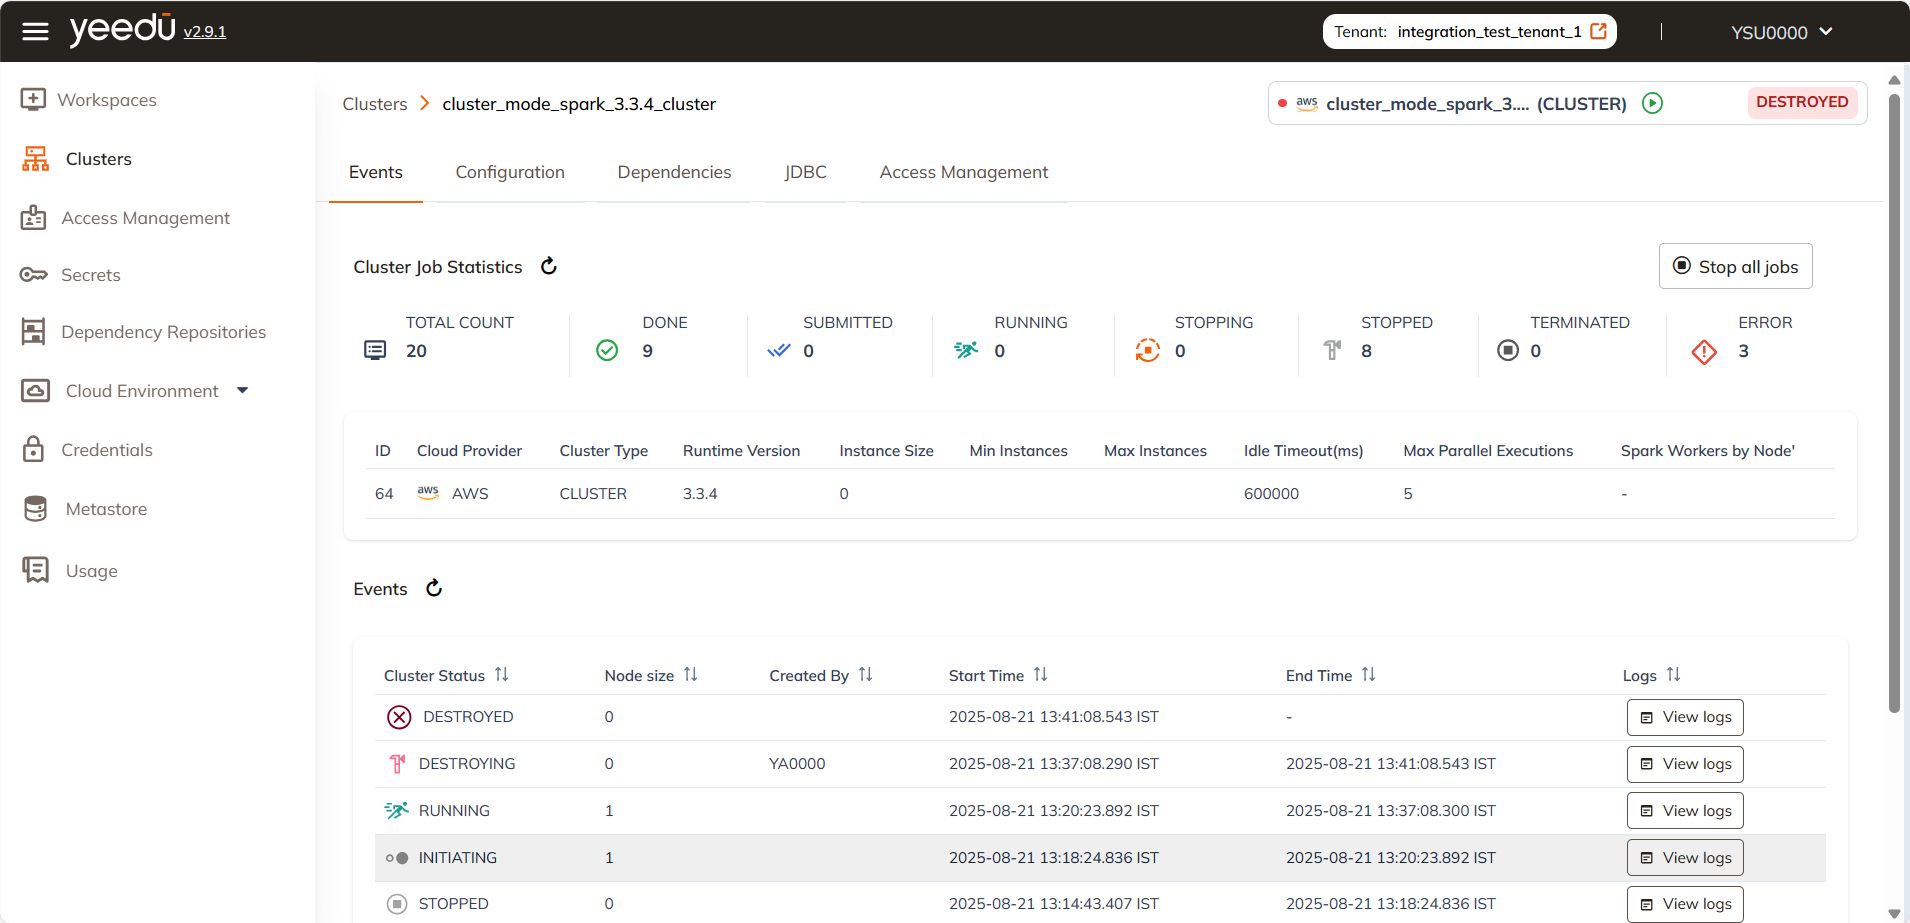
Events
The Events window has 3 sections:
- The first section displays basic configuration details about the cluster like ID, Cloud Provider, Cluster Type, Runtime Version, Instance size, Min Instances, Max Instances, Idle Timeout(ms), Auto shutdown , Max parallel execution , Spark workers by node.
- Job Statistics: This section displays the count of jobs associated with the cluster along with their status. The status displayed are: Submitted, Running , Done, Error, Terminated, Stopping, Stopped and Total Job Count
- Events: The events section displays all the events associated with cluster along with the option to view logs of the specific events. There are 2 tabs in Cluster log: Stdout and Stderr.
- Stdout: Standard output of the cluster.
- Stderr: Standard error of the cluster. On the right side of the window, user has 3 buttons:
- Refresh: Allows refreshing the log window.
- Copy: Enables copying the logs.
- Download: Allows downloading the logs in '.log' format.
- JDBC: For detailed information on JDBC, please click on Setting Up Thrift Server for Yeedu
Configuration
The Configuration window enables the user to edit or make changes to the already created cluster.
To Edit the Cluster details, the cluster must be in stopped state.
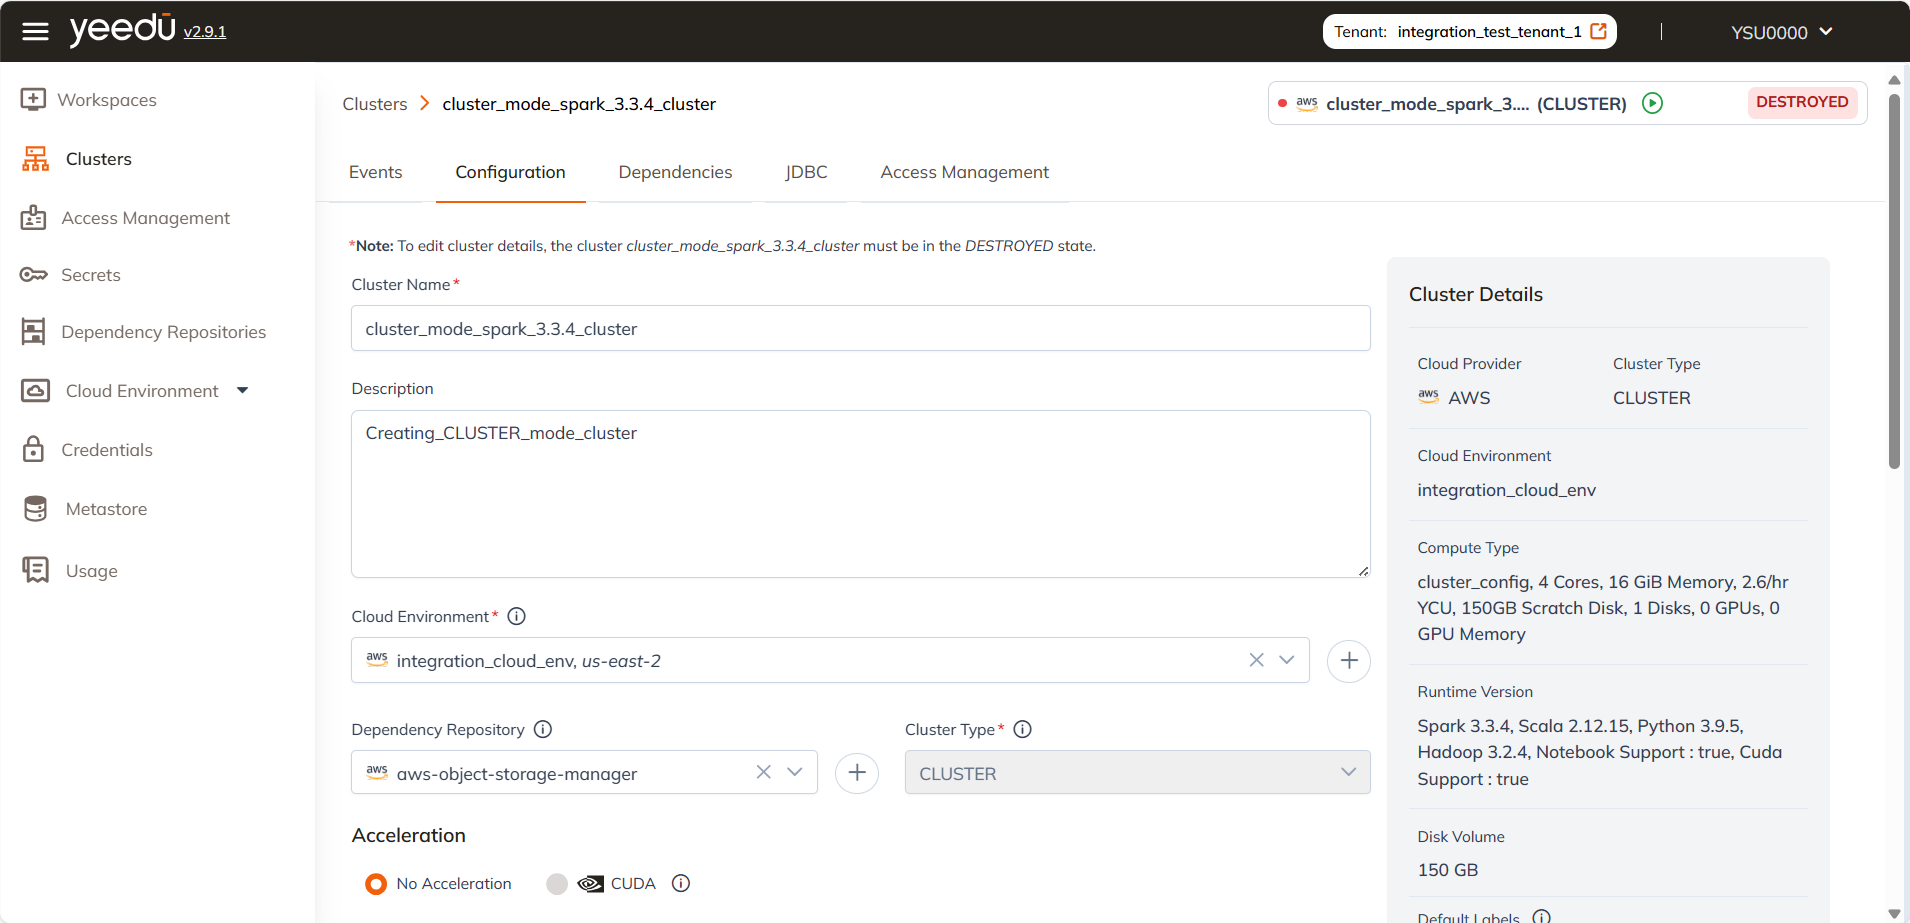
Users can make changes to all the fields except for cluster type. Once cluster is created , cluster type cannot be updated. Users need to destroy the cluster and create a new one in that case. Apart from cluster type, all other fields are editable, and the user can make changes as per their requirements.
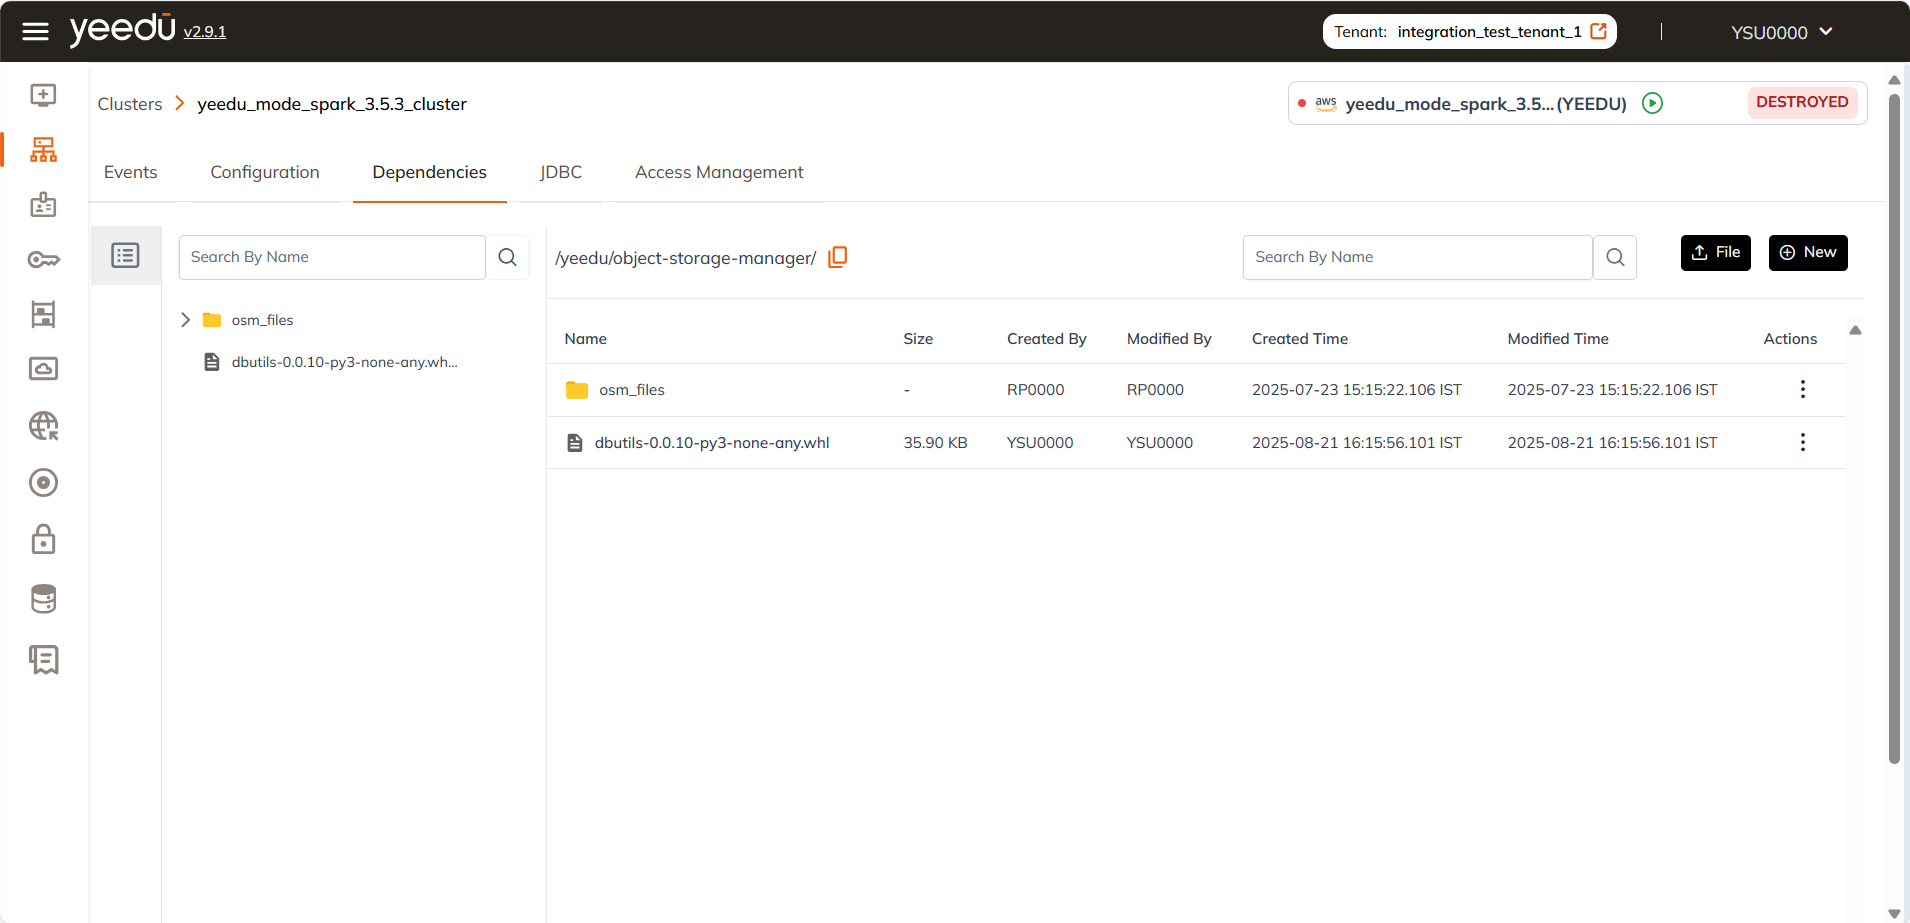
Dependencies
In this window, the users can manage the Dependency repository associated with the cluster.
On the right side of the screen, the users have an option to upload new files by clicking on the ‘+ File’ button. Users can also delete the files by clicking on the 3 Dot button in the action tab.
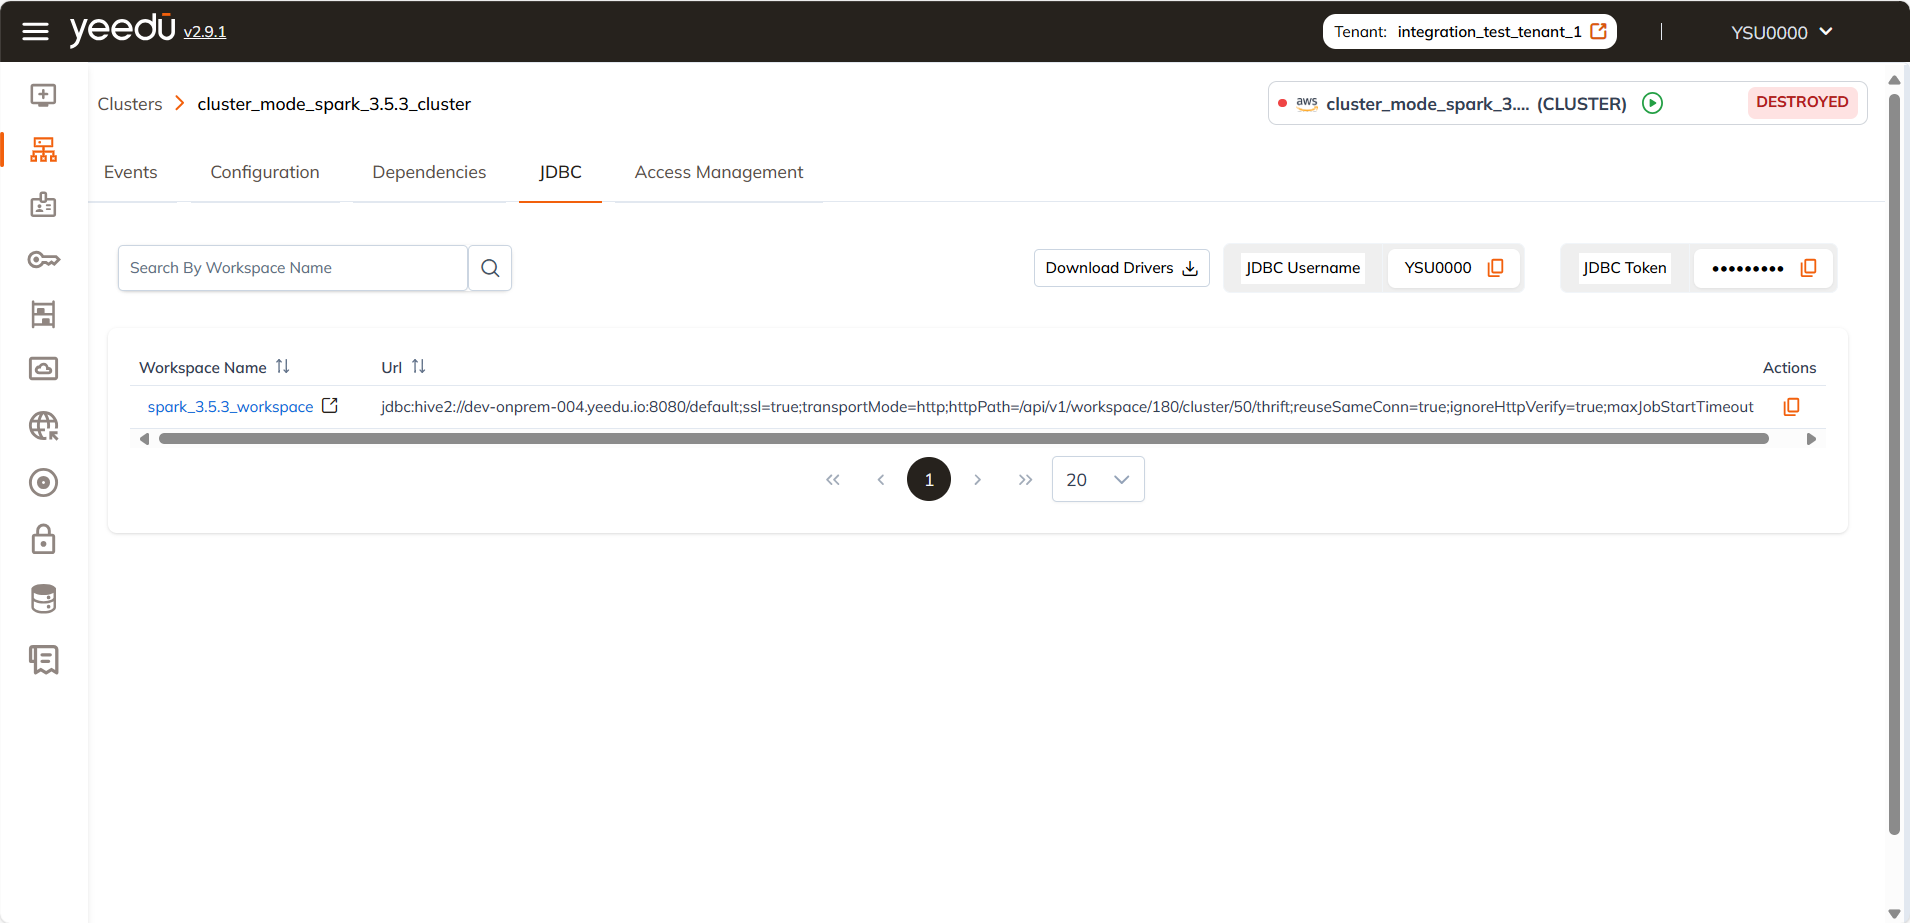
JDBC
The JDBC tab in the cluster provides essential details for connecting to the cluster's Thrift server via JDBC. These details include the JDBC driver, connection URL, username, and authentication token. Additionally, the tab displays a list of all workspaces linked to the cluster, simplifying workspace management and access. However, Thrift SQL is not supported due to the cluster’s current runtime version.
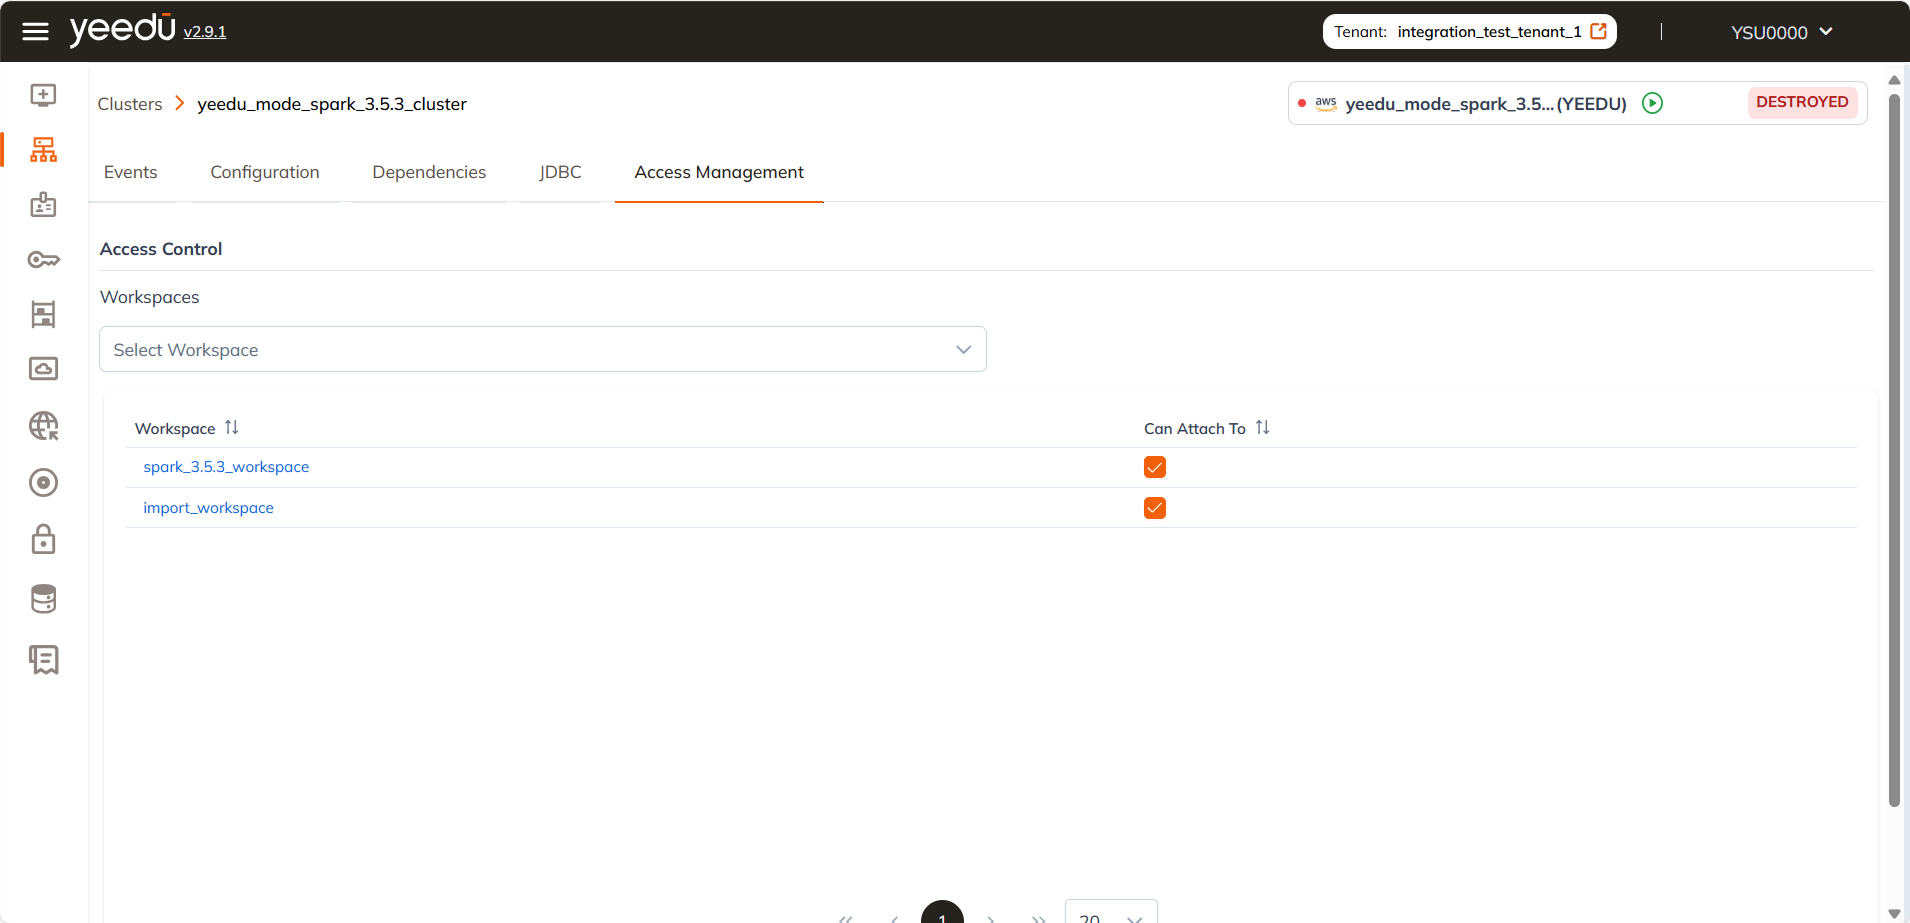
Access Management
In the Access Management tab of cluster , user can manage which workspaces should have access to the following cluster. Users can add or delete workspaces by either searching or selecting the checkbox next to workspace name. If the ‘Can Attach to’ checkbox is selected, then the cluster is attached to the workspace.
Auto Shutdown
- If no jobs are submitted within the selected Auto Shutdown time, the cluster will automatically stop.
- The minimum auto shutdown time is 10 minutes.
- This feature helps in cost efficiency by shutting down unused clusters.
Warm Start/Stop Mechanism
The Warm Start/Stop feature is implemented to reduce cluster startup time. Instead of taking 6-7 minutes, the optimized process ensures that the cluster is ready within one minute. This improves resource allocation efficiency and minimizes delays.
- Go to the Cluster Dashboard.
- Click on the + Cluster button (found above the Action tab on the right side of the screen).
- A pop-up window will appear, prompting you to enter details for the new cluster.
- Fill in the necessary fields, such as:
- Cluster Name
- Cloud Environment
- Run Time Version
- Compute Type
- Instance Configuration
- Click on Create to start the process.
- It takes 6 to 7 minutes for the backend to complete the bootstrap process.
- Once the cluster is created, it will be available for use within one minute.
Starting and Stopping a Cluster
You can start or stop the cluster anytime depending on job execution.
-
To start the cluster:
- Navigate to the cluster in the dashboard.
- Click the Start button next to the cluster name.
-
To stop the cluster:
- Click the Stop button.
- This stops all running jobs and frees up resources.
Viewing Cluster Details
-
Once the cluster is running, you can view details such as:
- Cloud Provider (AWS, Azure, etc.)
- Compute Type (CPU, Memory, GPUs, etc.)
- Runtime Version (Spark, Hadoop, Python versions)
- Disk Volume and Storage Details
- Instance Size and Execution Slots
Managing Cluster Jobs
-
The Cluster Dashboard provides real-time insights into:
- Total jobs submitted.
- Jobs currently running.
- Errors encountered.
- Completed and stopped jobs.
-
Users can click on View Logs to check job details and troubleshoot issues.
Graviton Instances
Graviton (ARM64 or aarch64) instances are ARM-based compute types optimized for:
- Better price-performance ratio
- High memory and disk throughput
- Workloads like Python pipelines, Spark jobs, or GPU-free machine learning
How to Use aarch64 in Cluster Creation
Go to:
Clusters → + Create Cluster
Yeedu Cluster Turbo Acceleration
What Is Turbo Acceleration?
Turbo Acceleration is a performance-boosting option for Spark clusters in Yeedu. When enabled:
- Spark jobs and SQL queries execute faster
- Session responsiveness improves in Notebooks
- Backend is optimized for better parallelism and reduced latency
- Comes at no extra cost
How to Enable Turbo Mode
Go to:
Clusters → + Create Cluster → select Turbo (radio button)
In the Acceleration section:
| Option | Description |
|---|---|
| No Acceleration | Default Spark mode (no special optimizations) |
| Turbo | Enables optimized Spark execution engine |
| CUDA | Reserved for GPU-accelerated environments |
Use Cases for Turbo
Use Turbo for scenarios requiring fast execution and responsiveness—such as interactive notebooks, complex SparkSQL queries, exploratory data analysis, and performance-optimized pipelines.
The recommended resolution for Yeedu UI is 1920 x 1080.