Create Notebook
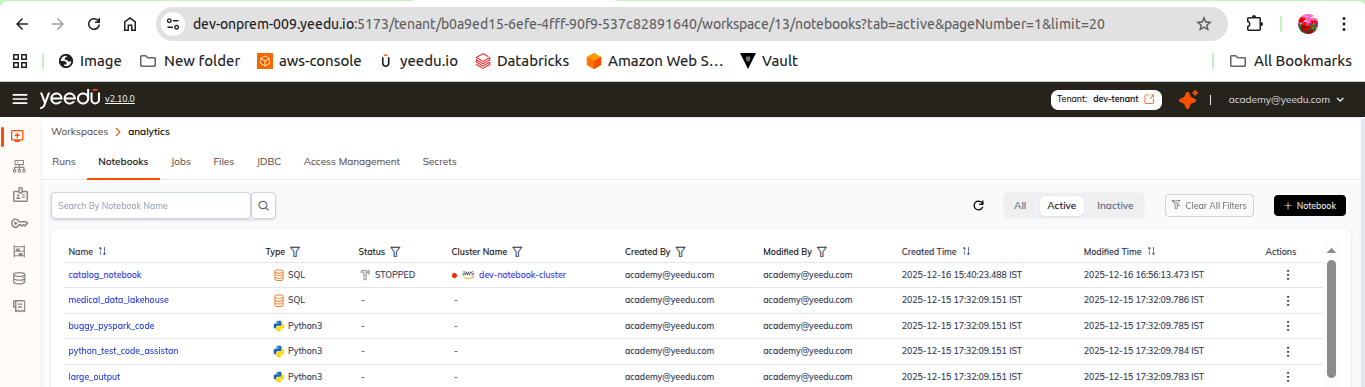
Notebooks live inside a Workspace, under the Notebooks tab. From there you can browse existing notebooks and create new ones. The list page carries a toolbar, a nine-column grid, and a kebab menu on every row holding exactly four entries: Edit, Clone, Inactive and Export. Clicking + Notebook swaps the grid for the create form, which marks only Name and Type as required. Path and Advanced Options are both optional.
Notebooks List Page
Open a Workspace and select the Notebooks tab to see every notebook in that Workspace.
Route: /tenant/<tenantId>/workspace/<workspaceId>/notebooks
Toolbar
The toolbar controls appear in this order, left to right:
| Control | Purpose |
|---|---|
| Search By Notebook Name field + search button | Filter the list by notebook name. |
| Clear filters (icon) | Reset all active column filters and the search box. |
| Refresh (icon) | Reload the list from the server. |
| Column chooser (icon) | Show or hide individual columns in the grid. |
| All / Active / Inactive (pills) | Switch between all notebooks, only active ones, and only inactive ones. Each pill shows a count, for example All 40, Active 20, Inactive 20. |
| + Notebook (button) | Open the Create Notebook form. |
Columns
The grid has nine columns, in this order:
| # | Column | Description |
|---|---|---|
| 1 | Name | Notebook name. It links to /tenant/<tenantId>/workspace/<workspaceId>/notebook/<notebookId> — the notebook editor. |
| 2 | Type | Notebook language — Python3, Scala, or Sql. Filterable. |
| 3 | Status | Status of the notebook's last run (for example STOPPED). A dash (-) means the notebook has never been run. Filterable. |
| 4 | Cluster Name | Cluster the notebook is attached to. Links to that cluster's Events page. Filterable. |
| 5 | Created By | User who created the notebook. Filterable. |
| 6 | Modified By | User who last modified the notebook. Filterable. |
| 7 | Created Time | Date and time the notebook was created. |
| 8 | Modified Time | Date and time of the last modification. |
| 9 | Actions | A single kebab menu (⋮). |
The list is paginated, with a page-size selector (default 20 per page).
Row Actions
The Actions kebab has exactly four entries:
| Entry | Effect |
|---|---|
| Edit | Opens the notebook form for editing. |
| Clone | Creates a copy of the notebook. |
| Inactive | Deactivates the notebook. On an already deactivated notebook this entry reads Active and reactivates it. |
| Export | Exports the notebook. |
Create Notebook Form
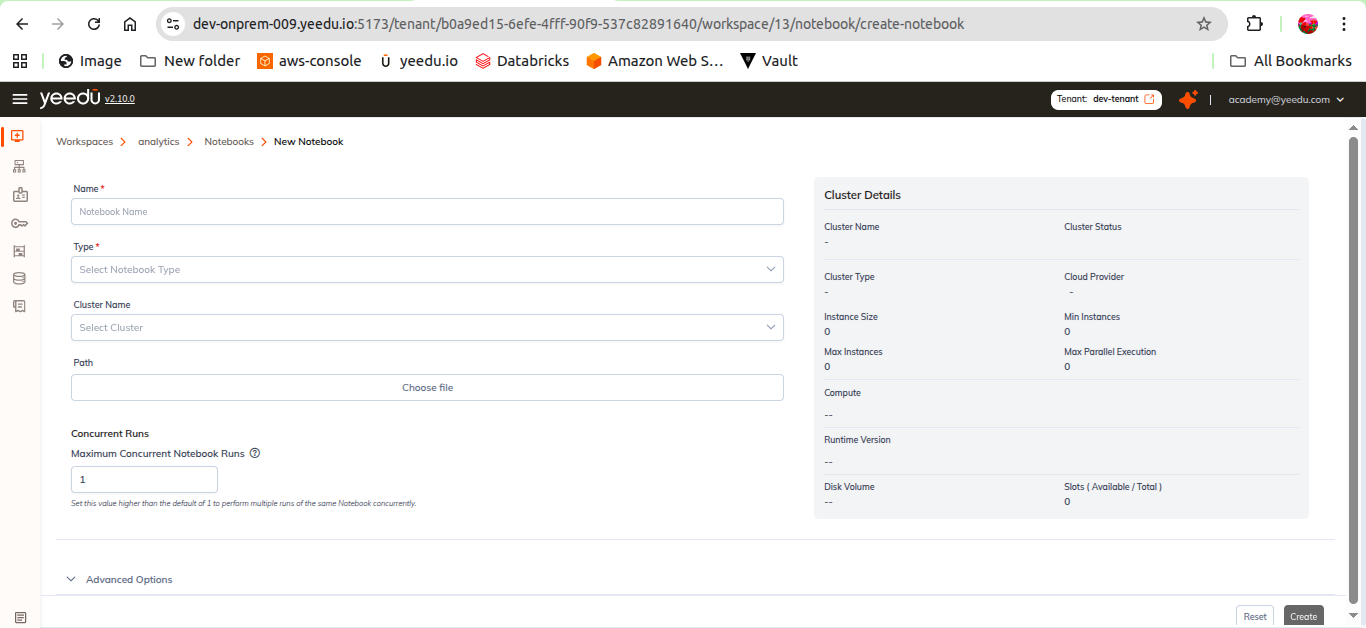
Click + Notebook to open the form at /workspace/{workspace_id}/notebook/create-notebook. The breadcrumb reads Workspaces > {workspace} > Notebooks > New Notebook.
The page is laid out in two columns: the form on the left and a live CLUSTER DETAILS summary card on the right.
Fields
| Field | Control | Values / notes |
|---|---|---|
| Name (required) | Text | Placeholder Notebook Name. Up to 64 letters, digits, and the symbols ., _, -. An invalid value shows Invalid format. Max 64 letters, 0-9, ., _ or -. |
| Type (required) | Dropdown | Python3, Scala, Sql — each option is shown with its language icon. Defaults to Python3. |
| Cluster Name | Dropdown with an inline [+] button | Placeholder Select Cluster. Lists the clusters available to the Workspace. Use [+] to create a new cluster without leaving the form. |
| Path | File picker | Choose file button. Points the notebook at an existing .ipynb file in the Workspace, or uploads one. |
| Maximum Concurrent Notebook Runs (under Concurrent Runs) | Number | Defaults to 1. |
Type
The Type dropdown offers exactly three values:
- Python3
- Scala
- Sql
See Notebook Types for guidance on choosing one.
Path
The Path field is optional:
- If a valid
.ipynbfile is chosen or referenced, we use that file. - If you don't fill it in, we automatically generate a new
.ipynbfile inside the Workspace files area.
Concurrent Runs (max_concurrency)
The Concurrent Runs section holds a single field, Maximum Concurrent Notebook Runs, marked with an information (ⓘ) icon. This is the max_concurrency property referenced in the release notes as "Added max_concurrency when creating or editing notebooks". The API and CLI name for the field is max_concurrency, while the UI label is Maximum Concurrent Notebook Runs.
Its help text reads:
Set this value higher than the default of 1 to perform multiple runs of the same Notebook concurrently.
The default value is 1, meaning one run of the notebook at a time. Raising it allows that many simultaneous runs of the same notebook.
Advanced Options
We collapse Advanced Options by default. Expand it to attach Spark configuration and dependencies to the notebook.
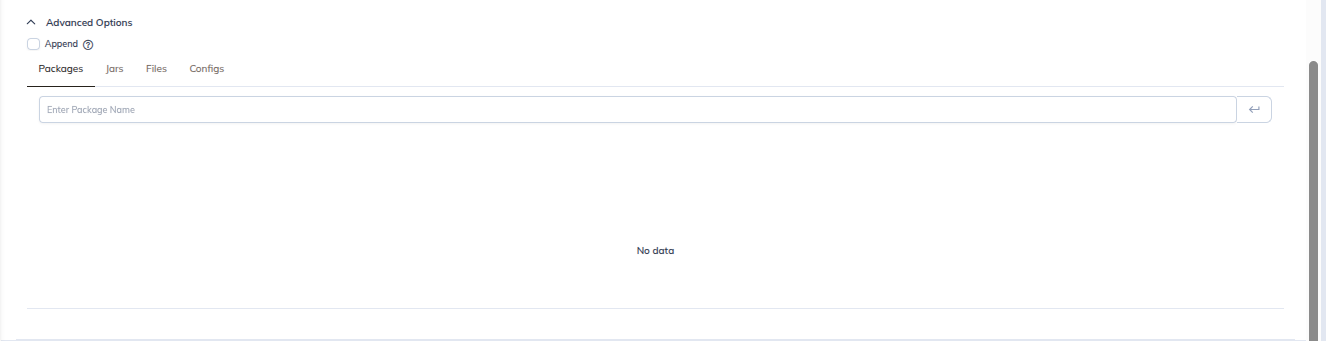
- Append (checkbox, with an ⓘ icon). Controls whether the notebook-level Spark configuration is appended to the cluster-level configuration or overrides it.
Below the checkbox are four tabs:
| Tab | Purpose |
|---|---|
| Configs | Spark configuration properties, entered as Key / Value rows. A Bulk Edit toggle switches the tab to a free-text editor for pasting many properties at once. Each row has an add [+] and a delete (🗑) button. |
| Packages | Packages to make available to the notebook session. |
| Jars | JAR files to add to the session classpath. |
| Files | Files to distribute to the notebook session. |
The notebook form exposes four Advanced Options tabs. That's a smaller set than the Job form (six tabs) and the Cluster form's Spark Config section (ten tabs). The Advanced Options panel inside the notebook editor exposes five tabs: the same four plus a read-only Resources tab. See Advanced Options.
Advanced Options are available for all three notebook types, Python3, Scala, and Sql.
Cluster Details Panel
The right-hand CLUSTER DETAILS card updates live as soon as a cluster is chosen in Cluster Name. It's the same component we use on the Create Cluster and Create Job forms, and it shows:
| Field | Description |
|---|---|
| Cluster Name | Name of the selected cluster. |
| Cloud Provider | Cloud provider backing the cluster. |
| Cluster Type | Cluster type of the selected cluster. |
| Instance Size | Instance size configured on the cluster. |
| Min Instances | Minimum instance count. |
| Max Instances | Maximum instance count. |
| Turbo Acceleration | Enabled or Disabled. |
| Compute | Compute configuration selected on the cluster. |
| Runtime Version | Yeedu runtime version the cluster runs. |
| Disk Volume | Disk volume attached to the cluster. |
| Max Parallel Exec | Maximum number of parallel executions the cluster allows. |
| Slots (Avail/Total) | Available slots out of total slots on the cluster. |
Use this panel to confirm the target cluster has free slots and the capabilities the notebook needs before creating it.
Actions
| Button | Effect |
|---|---|
| Reset | Clears the form back to its default values. |
| Create | Creates the notebook and returns to the Notebooks list. |